Guide To Using Blend Modes
If you've been using GameMaker for any length of time, you will almost certainly have come across blend modes, and probably even used them in your games. Blend modes are a great way to change how something is drawn to give interesting and specific graphical effects, but do you know how they work and how to use them? This is a subject that can confuse people and so in this section we hope to dispel some of the mystery surrounding blend modes and enable you to use them to their fullest extent in your games.
Overview
Blend modes basically tell your game to draw certain things blended with whatever else is already drawn beforehand. Everything you draw to the screen is made up of four component parts - Red, Green, Blue and Alpha - and by default they are drawn to the screen using the blend mode bm_normal.
This blend mode draws all pixels with their colour and alpha values essentially unchanged (although, later in this section you'll see that this isn't quite true...), but GameMaker has a number of built-in blend modes that can be set to change this behaviour.
How Things Are Drawn
When GameMaker goes to draw a pixel, there's a source colour (the colour of the pixel you are going to draw) and a destination colour (the colour that's already in the pixel we're drawing to). For example, if you're drawing a pink colour after having drawn a yellow colour at the same pixel, pink is the source (what you're drawing), and yellow is the destination (as it's already there).
When determining the final colour of a pixel, GameMaker will combine the source and destination colours according to the blend mode -- basically asking, "how should I combine the pink and the yellow?".
Calculating Final Colour
Both the source colour and destination colour contain RGBA (Red, Green, Blue and Alpha) components, each of which are floating point values between 0 and 1.
The final colour of a pixel is calculated by multiplying each component of the source and destination by a factor, and then bringing them together according to the set equation.
This means that the way a final pixel colour is calculated is the following: (source * factor) + (destination * factor).
Here, both values are finally added together, as the default equation is bm_add, however you can change that to subtract or to use some other equation (covered later on this page).
Basic Blend Modes
Use the function gpu_set_blendmode to apply a set of blend factors and equation at the same time, as a "preset" blend mode.
You would call this before (for example) drawing a sprite, then reset it afterwards, something like this:
gpu_set_blendmode(bm_add);
draw_self();
gpu_set_blendmode(bm_normal);
That code draws the instance sprite using an additive blend mode. The additive blend mode is set using one of the available GML constants, of which there are six for basic modes:
| Blend Mode Constant |
|---|
| Constant | Description | Extended Blend Mode | Blend Equation |
|---|
| bm_normal | Normal blending (the default blend mode). | (bm_src_alpha, bm_inv_src_alpha) | bm_eq_add |
| bm_add | Additive blending. Luminosity values of light areas are added. | (bm_src_alpha, bm_one) | bm_eq_add |
| bm_subtract | Subtractive blending. Source is subtracted from the destination. | (bm_src_alpha, bm_one) | bm_eq_subtract |
| bm_reverse_subtract | Reverse subtractive blending. Destination is subtracted from the source. | (bm_src_alpha, bm_one) | bm_eq_reverse_subtract |
| bm_min | Smaller value from source and destination is selected. | (bm_one, bm_one) | bm_eq_min |
| bm_max | Max blending. Similar to additive blending. | (bm_src_alpha, bm_inv_src_colour) | bm_eq_add |
The "Extended Blend Mode" column shows the factors that are applied to the source and the destination (respectively), and the "Blend Equation" column shows the equation used to bring those two values together.
Let's now look through how each basic blend mode works.
NOTE These examples demonstrate blend modes using a green background, with a blue square drawn on it, both of which count as the destination. A grey square is drawn as the source, using each of the blend modes.
bm_normalbm_normal
bm_normal is the default blend mode, which multiplies the source colour with its alpha, and multiplies the destination colour with the inverse of the source alpha (to make space for the source colour to fit in). Finally it adds both together (as the equation is bm_add):
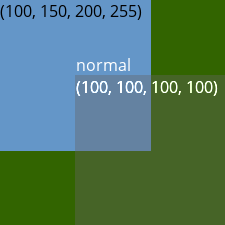
The background colour in this example is (50, 100, 0, 255).
bm_addbm_add
This blend mode multiplies the source colour with its alpha, just like bm_normal, however it keeps the destination as-is (bm_one). It then adds both together, resulting in a lighter colour. Note that colour values can't go over 255 (or under 0), so anything that adds up to more than that will be clamped to 255.
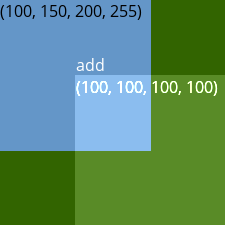 The background colour in this example is (50, 100, 0, 255).
Using this blend mode is a great way to get that "neon glow" look, and is most often used for lighting effects, lasers or just about anything that you want to appear to glow or have luminescence.
bm_subtractbm_subtract
This mode uses the same factors as bm_add, however it uses the subtract equation so the source colour is subtracted from the destination colour (i.e. foreground is removed from the background).
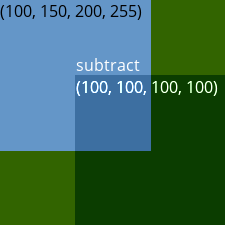 The background colour in this example is (50, 100, 0, 255).
This is useful for removing parts of an image using a mask, as shown in an example later on this page under "Blend Equations".
bm_reverse_subtractbm_reverse_subtract
| Constant | Description | Extended Blend Mode | Blend Equation |
|---|
| bm_reverse_subtract | Reverse subtractive blending. Destination is subtracted from the source. | (bm_src_alpha, bm_one) | bm_reverse_subtract |
This again uses the same factors as both bm_add and bm_subtract, but uses the reverse-subtract equation, so the destination colour is subtracted from the source colour (i.e. background is removed from the foreground).
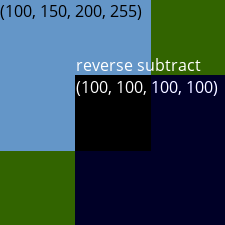 The background colour in this example is (50, 100, 0, 255).
bm_minbm_min
This uses the bm_one factor for both source and destination colours, so they are not changed at all. Then it makes use of the minimum equation, so that whichever component value is smaller between the source and the destination (for each of R, G, B and A) is used for the final pixel.
 The background colour in this example is (50, 100, 0, 255).
bm_maxbm_max
This blend mode is more complex to explain, but it basically multiplies the source colours by the source alpha, then adds them to the destination colour values multiplied by the inverse source colour values. The actual maths behind bm_max (and the other blend modes) we'll cover in part two of our article, but all you need to know is that the result will be a more "saturated" and brighter colour, without leading to the same pure white brilliance that using bm_add will cause.
 The background colour in this example is (50, 100, 0, 255).
Now you know the very basics behind using a blend mode in GameMaker. It takes the RGBA values for the source image (what is being drawn) and it then blends these with the RGBA values of the destination (what is being drawn to).
This blending is done by multiplying the individual components for each pixel colour and alpha by different amounts, depending on the effects that we wish to achieve, and then calculating the final pixel value from both using the set equation.
With this knowledge, you can start to use blend modes in your games to get glowing lasers, realistic shadows, or saturated transition effects, but there is still more to be learned here! Below we look at the extended blend modes (factors), as well as explore a bit of the maths behind them, so that you can create your own blending effects like multiply or overlay.
Extended Blend Modes (Factors)
Above we have talked about the function gpu_set_blendmode, but now we are going to look at gpu_set_blendmode_ext.
We saw that each of the built-in blend modes applies factors to the source and destination colours. For example, bm_add multiplies the source with its alpha, and multiplies the destination with 1.
With gpu_set_blendmode_ext, you can manually set the factors for the source and destination colours, separately. This gives you a ton more options to draw your pixels, as you can now manually choose what the source multiplies with, and then what the destination multiplies with.
Denoting Components
As you already know, both source and destination colours have RGBA components. Each of these components are values between 0 and 1.
We denote the source RGBA as (Rs, Gs, Bs, As) and destination RGBA as (Rd, Gd, Bd, Ad).
Knowing these will help you understand how each factor works, as one factor may use e.g. the Rs value (source red), but another may use Rd (destination red), and so on.
Calculating The Final Pixel
When you go to draw something, the GPU gets this:
- (Rs, Gs, Bs, As) = the RGB and Alpha of the colour you are going to draw.
- (Rd, Gd, Bd, Ad) = the RGB and Alpha of the colour that is already there at the pixel position.
Then it does the following for every single pixel:
final_pixel_colour = (Rs,Gs,Bs,As) * source_blend_factor + (Rd,Gd,Bd,Ad) * destination_blend_factor
As you can see, it is multiplying the source and destination RGBAs with their set factors. It then adds them together as per the default equation.
Blend factors are defined in GameMaker by a number of GML constants. Each constant is a factor that you can use for the source or destination (or both). The following factors are available:
| Blend Mode Factor Constant |
|---|
| Constant | Blend factor (Red, Green, Blue, Alpha) |
|---|
| bm_zero | (0, 0, 0, 0) |
| bm_one | (1, 1, 1, 1) |
| bm_src_colour | (Rs, Gs, Bs, As) |
| bm_inv_src_colour | (1-Rs, 1-Gs, 1-Bs, 1-As) |
| bm_src_alpha | (As, As, As, As) |
| bm_inv_src_alpha | (1-As, 1-As, 1-As, 1-As) |
| bm_dest_alpha | (Ad, Ad, Ad, Ad) |
| bm_inv_dest_alpha | (1-Ad, 1-Ad, 1-Ad, 1-Ad) |
| bm_dest_colour | (Rd, Gd, Bd, Ad) |
| bm_inv_dest_colour | (1-Rd, 1-Gd, 1-Bd, 1-Ad) |
| bm_src_alpha_sat | (f, f, f, 1) where f = min(As, 1-Ad) |
The second column shows you what values each of the R, G, B, A components are multiplied with, when that factor is being used.
Example of how bm_normal WorksExample of how bm_normal Works
Time to look at a practical example of how this comes together for drawing in GameMaker. For this, we are going to look at the bm_normal blend mode, which is simply:
gpu_set_blendmode_ext(bm_src_alpha, bm_inv_src_alpha);
gpu_set_blendequation(bm_add);
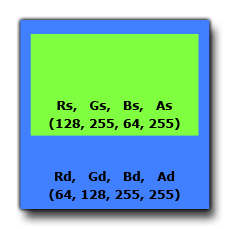
One of the problems people have with blend modes is visualising the results, so to show the maths behind them, we'll use this blend mode as our test subject since it's the blend mode that everyone uses the most and we know exactly what to expect from it. Imagine we are drawing a rectangle with the colour (128, 255, 64, 255) over a background with the colour (64, 128, 255, 255):
 So, our blending calculations look like this:
Colours:
Source: (128, 255, 64, 255) = (0.5, 1, 0.25, 1)
Destination: (64, 128, 255, 255) = (0.25, 0.5, 1, 1)
Factors:
bm_src_alpha (As, As, As, As) = (255, 255, 255, 255) = (1, 1, 1, 1)
bm_inv_src_alpha (1-As, 1-As, 1-As, 1-As) = (0, 0, 0, 0)
Formula:
(Rs,Gs,Bs,As) * bm_src_alpha + (Rd,Gd,Bd,Ad) * bm_inv_src_alpha
Apply factors:
(0.5, 1, 0.25, 1) * (1, 1, 1, 1) + (0.25, 0.5, 1, 1) * (0, 0, 0, 0)
Apply equation:
(0.5, 1, 0.25, 1) + (0, 0, 0, 0)
Final pixel:
(0.5, 1, 0.25, 1) = (128, 255, 64, 255)
As you can see, we multiply the destination values by 0, which gives them a value of 0 too, meaning that the source colours are unchanged, so our final colour value is (128, 255, 64, 255).
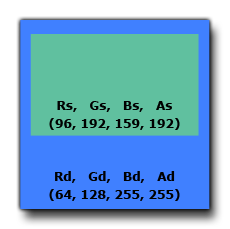
You can see how the inclusion of a lower alpha affects this calculation:
Colours:
Source (128, 255, 64, 128) = (0.5, 1, 0.25, 0.5)
Destination: (64, 128, 255, 255) = (0.25, 0.5, 1, 1)
Factors:
bm_src_alpha (As, As, As, As) = (128, 128, 128, 128) = (0.5, 0.5, 0.5, 0.5)
bm_inv_src_alpha (1-As, 1-As, 1-As, 1-As) = (0.5, 0.5, 0.5, 0.5)
Formula:
(Rs,Gs,Bs,As) * bm_src_alpha + (Rd,Gd,Bd,Ad) * bm_inv_src_alpha
Apply factors:
(0.5, 1, 0.25, 0.5) * (0.5, 0.5, 0.5, 0.5) + (0.25, 0.5, 1, 1) * (0.5, 0.5, 0.5, 0.5)
Apply equation:
(0.25, 0.5, 0.125, 0.25) + (0.125, 0.25, 0.5, 0.5)
Final pixel:
(0.375, 0.75, 0.625, 0.75) = (96, 192, 159, 192)
This gives a final pixel colour (96, 192, 159, 192), and will give an image like that shown below:
Hopefully you can see clearly now what the blend mode factors do, and how combining them can change what is drawn to create some interesting effects.
We will now look at a practical example of how to combine these factors to create your own custom blend modes.
Creating Your Own Blend Modes
Using the different factors available, you can create your own blend modes to achieve blending options that are not available to you normally. In this example, we are going to create a multiply effect like that used in Photoshop. We can simulate this blend mode using two of our above mentioned blend mode factor constants like this:
gpu_set_blendmode_ext(bm_dest_colour, bm_zero);
Before we actually draw something using this blend mode, let's have a look at how it should look in Photoshop:
 Using our extended blend mode we get the following:
(Rs, Gs, Bs, As) * (Rd, Gd, Bd, Ad) + (Rd, Gd, Bd, Ad) * (0,0,0,0) = (Rs, Gs, Bs, As) * (Rd, Gd, Bd, Ad)
Source colour * dest colour + dest colour * zero = source colour * dest colour
The blend factor bm_zero effectively removes the destination colour from the equation (as zero times anything is zero), so we are left with the source colour multiplied by the blend factor of the destination colour, hence the name "multiply" for the mode. To use this in GameMaker, you would simply have something like this in your Draw Event:
gpu_set_blendmode_ext(bm_dest_colour, bm_zero);
draw_self();
gpu_set_blendmode(bm_normal);
The next image was taken from a test project in GameMaker using this exact code:
 Can you spot the difference? Probably not! There will, however, be some deviation between the two due to differences between the render tools used, but it's almost exactly as you would expect.
Note though that not all the blend modes used by art programs are available to you within GameMaker due to the fact some of them can actually force the colour values to go over 255 and so create special effects, but that doesn't mean you can't create passable imitations of these effects, or even brand new effects, using them.
It's worth mentioning that with GameMaker you can take this one step further using the function gpu_set_blendmode_ext_sepalpha. This permits you to separate out the alpha component of the different blend mode factors and use them individually to create even more possible combinations. We won't cover this function here as it's explained in depth already in the manual, but it's worth mentioning just so you know it's available for use.
Blend Equations
Through reading this guide, you should already have a basic understanding of what a blend equation is. It controls how the source and destination colours are mixed together, after the factors have been applied.
By default, both the source and destination values are added together, as the default equation is bm_eq_add.
The following equations are available in GameMaker, which can be set using gpu_set_blendequation:
| Blend Mode Equation Constant |
|---|
| Constant | Description | Equation |
|---|
| bm_eq_add | Add both together (the default equation). | source + destination |
| bm_eq_subtract | Subtract source from destination. | destination - source |
| bm_eq_reverse_subtract | Subtract destination from source. | source - destination |
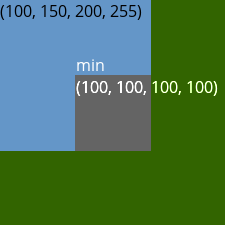
| bm_eq_min | Use whichever value is smaller. | min(source, destination) |
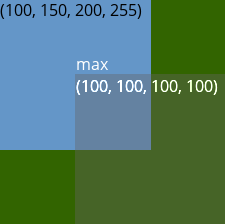
| bm_eq_max | Use whichever value is larger. | max(source, destination) |
IMPORTANT Blend factors are not applied when bm_eq_min or bm_eq_max is used as the blend equation, which is effectively the same as using bm_one as the factors.
You can also set the equation used for RGB and Alpha separately using gpu_set_blendequation_sepalpha.
Using Equations
You can use the bm_eq_subtract equation to achieve the following effect:
Here, we're drawing a sprite to a surface, and then drawing a circle that subtracts whatever is in the surface. The surface is then drawn to the screen.
This can be achieved with the following Create and Draw event code:
Create Event
surf = surface_create(128, 128);
surf_x = 175;
surf_y = 90;
Draw Event
if (!surface_exists(surf))
{
surf = surface_create(128, 128);
}
// Draw to surface
surface_set_target(surf);
draw_sprite(spr_box, 0, 0, 0);
gpu_set_blendequation(bm_eq_subtract);
draw_circle(mouse_x - surf_x, mouse_y - surf_y, 32, 0);
gpu_set_blendequation(bm_add);
surface_reset_target();
// Draw surface to screen
draw_surface(surf, surf_x, surf_y);
First we create a surface and define its room position. Then in the Draw event, we check if the surface doesn't exist, and then recreate it.
Then we draw the following to that surface:
- A sprite, drawn normally. Parts of this will be "removed" so we can see through it.
- A circle, drawn at the mouse position, using the bm_eq_subtract equation.
The circle will subtract its alpha value from whatever is already in the surface, allowing us to see through it.
The surface is then drawn in the room at its defined position.
Surfaces And Alpha
One final thing is worth noting about blend modes, and that is how they affect the alpha component of a colour. When simply drawing to the application surface or the display buffer, you don't really need to take into consideration the destination alpha value as it will always be one. However surfaces that you make yourself are different, since you can clear a surface to have any alpha value from zero to one that you wish. This leads to some interesting effects that are contrary to what most people would expect.
To illustrate this, we are going to look at drawing using the basic default bm_normal. Most people think that having a surface cleared to alpha 0, and then drawing something with an alpha of 0.5 will give a resulting alpha value 0.5 too... but this is not the case and is something that many people think is a "bug" in how GameMaker renders things. However, as you will see, it's not a bug at all!
Say you have surface with every pixel at alpha 0, then you draw a circle on it with alpha 0.5 using the bm_normal blend mode. The entire surface is still going to be alpha 0, but in the circle the alpha will actually be 0.25, since:
0.5 * 0.5 + 0 * 0.5 = 0.5 * 0.5 = 0.25
If you then proceed to draw another circle in the existing circle, also with an alpha of 0.5, then the alpha outside the circles would be 0, in between the circles 0.25, and in the smaller circle it would be 0.375:
0.5 * 0.5 + 0.25 * 0.5 = 0.25 + 0.125 = 0.375
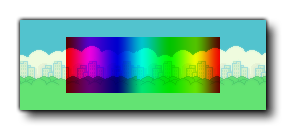
If you were to continue to draw a number of 0.5 alpha circles to a surface with 0 alpha, and then draw this surface to the room, you would be able to clearly see this:
 If you are still a bit confused about the alpha, try to picture it as just another colour. It behaves like a colour and all calculations on it are done in a similar manner. It's just not really visible, although the effect it has on other colours is. Which brings us to the final thing to note when using surfaces and blend modes (even bm_normal)...
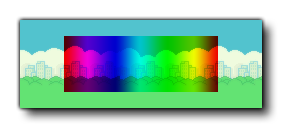
Even if the alpha of the surface is 0, the colour components are still there and exist and will influence in all blending operations. So drawing to a zero alpha cleared surface that has been cleared using the colour red (for example) will blend the source colours with the destination colours and give different effects to what you may think. The above image was created on a surface cleared to black, but if we clear the surface to red, we get this instead:
 Hopefully you can now work out why this happens for yourself using the formulas we've outlined above and applying the appropriate figures for bm_normal.