By default when you "paint" tiles onto a tile map layer in the room editor, you select a single tile and paint with that. However, tile sets are almost always designed to have sections that fit together in different ways to form whole areas or items. For example, an RPG tile set may have landscape feature tiles that can be connected to create larger or smaller features - like trees and buildings - depending on the number of tiles used. Now, placing multiple features like this on a room layer would require you to go back and forth many times to change tile, which is not good for your workflow. To resolve this, GameMaker enables you to create tile Brushes in the Tile Set editor, available when you click ![]() on the Brush Builder button:
on the Brush Builder button:
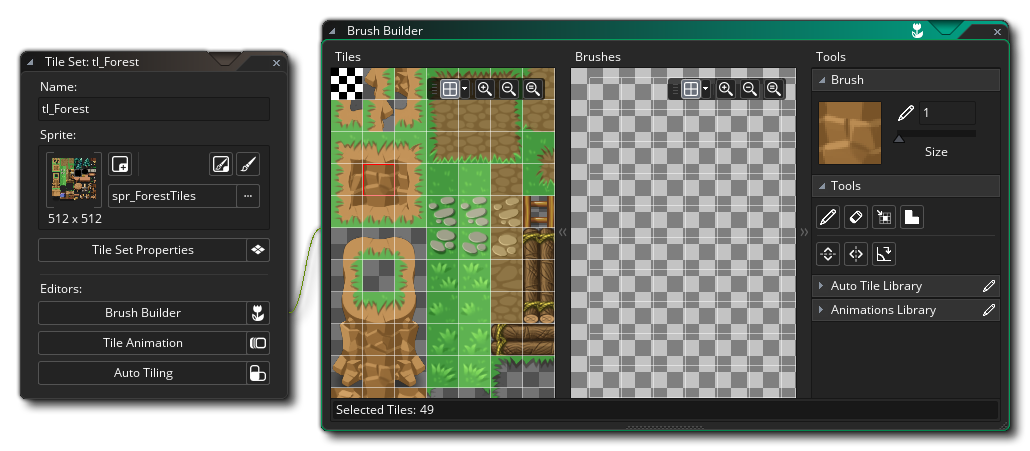 In the Brush Builder you have the original tile set on the left and a blank "canvas" on the right. You can now select any tile from the left and paint it on the right to create custom "brushes" which you can then use in the room editor. Note that you can click and hold the left mouse button
 ![]() then drag on the tile set to select multiple tiles to paint into the brush canvas and you can also hold down
then drag on the tile set to select multiple tiles to paint into the brush canvas and you can also hold down ![]() /
/ ![]() +
+ ![]() to add specific individual tiles or hold down
to add specific individual tiles or hold down ![]() +
+ ![]() to remove specific tiles.
to remove specific tiles.
The following image shows our previously mentioned landscape features as an example of three custom brushes made from a single tile set:
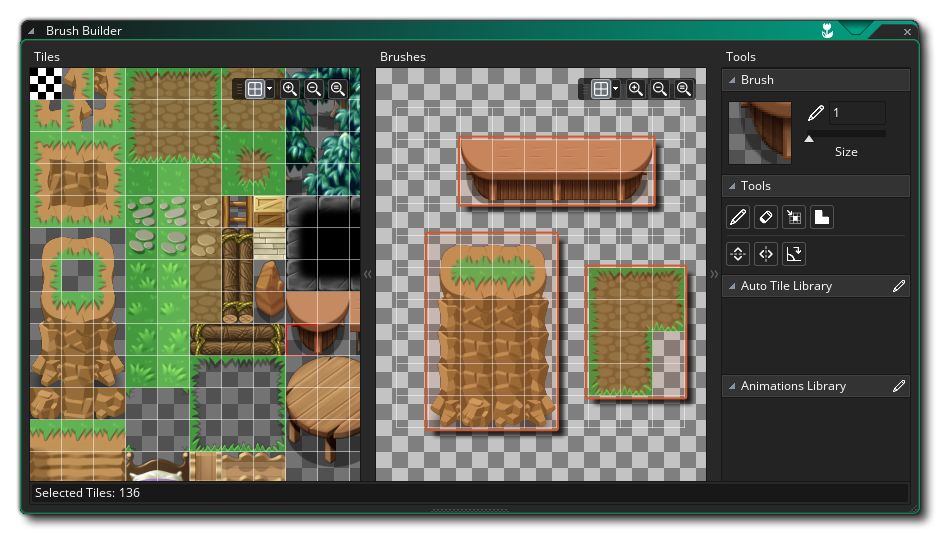 On the right you can see three features that we've made (highlighted with an orange box in the image). Notice how we've left a gap of one tile between each feature - this is because any touching group of tiles will be treated as a single brush in the room editor, so we leave a gap of one tile to show that each set is a distinct brush we want to create. While creating your brushes, you paint with the left mouse button
 ![]() and delete with the right mouse button
and delete with the right mouse button ![]() . You can also zoom the tile sheet or the brush canvas using
. You can also zoom the tile sheet or the brush canvas using ![]() /
/ ![]() and the mouse wheel
and the mouse wheel ![]() when the mouse is over one of the windows, or you can pan around using
when the mouse is over one of the windows, or you can pan around using ![]() +
+ ![]() or the middle mouse button
or the middle mouse button ![]() and dragging. Note that you can also use the zoom tools in the Toolbox within the editor windows to change the zoom levels of either window as well as toggle the grid visibility and colour.
and dragging. Note that you can also use the zoom tools in the Toolbox within the editor windows to change the zoom levels of either window as well as toggle the grid visibility and colour.
At the top right you can see the currently selected tool, and you can also set the size of the brush that you want to paint with. The default size is 1, which is a single tile, but if you set it to higher values then you can paint (and erase) with a larger brush composed of the selected tile repeated, as shown in the image below:
 The toolbox is where you can select the tool to use for many different tasks in the Tile Set editor, some of which will depend on whether you have anything defined in your auto tile library. A brief outline of each tool is given below (note that when you have selected a tile layer in the Room Editor, then this toolbox is displayed at the top of the room workspace, along with additional drawing tools):
| Pencil | This is the pencil tool. It uses the selected tile to paint in the Brushes window with the left mouse button | |
| Eraser | With the eraser tool you can use the left mouse button | |
| Selection | This is the selection tool, which can be used to define an area of the Brushes window for working on. You can click the left mouse button | |
| AutoTile | Clicking this tool enables the Auto tiling paint style. When this is active you can select any tile from the Autotile Libraries tab, and then paint it into the Brushes window and GameMaker will automatically change it to match the surrounding tiles, as long as you have correctly set up the Auto Tile Tab. Note that selecting a tile from the tile set that is not part of the autotile libraries will reset the drawing tool to the standard Pencil tool. | |
| Flip | Clicking the Flip tool with the left mouse button | |
| Mirror | Clicking the Mirror tool with the left mouse button | |
| Rotate | Clicking the Rotate tool with the left mouse button |
Below the tools, you can find two different sections for selecting any auto tile or animated tiles that have been created using the current tile set image. A single sprite that is used for a tile set can have many, many, single cell images in it, and these can be combined in the Animation or Autotile editor to create custom brushes which will show up in these sections and can be used in conjunction with regular static tiles to create brushes (note that an animated tile will animate regardless of whether you have selected it from the library or from the base tile set).
Once you have set up all the brushes you require, you can then use them to paint tiles onto any tile map layer within the Room Editor.