Guide To Using Particles
This guide is for those of you who want to understand how to use and create particles in GML. This page will cover both the GML Code functions and GML Visual actions for particles, so if you've never used particles before, we hope that this guide can get you started as they are very useful and quite fun to make.
TIP If you prefer a more visual approach to creating particles and don't need the extensive functionality that GML Code offers, you can also create a Particle System Asset using The Particle System Editor. Additionally, you can generate the GML Code for it using the editor's Copy GML to Clipboard  .
.
Before going any further, we should probably explain what a particle actually is... Basically, a particle is a graphic resource that has certain properties which are defined by a particle system. These properties cannot be manipulated directly for individual particles, but are changed collectively through the code or actions that are used to define the system that it belongs to. They are very useful for creating beautiful and flashy effects - or subtle and discreet ones - in a game without the CPU overhead that using instances has.
We have mentioned particle systems, so let's explain what that is before continuing. Think of a particle system like a container that you will use to hold your particles ready for use. You can use code or actions to define the visual aspect of the particles, and then they are placed in the "container" (the particle system) so that you can take it out and use it whenever and wherever you need it later.
Before setting up a system and creating particles, it's important to know a few things... First is that most of a particle systems code is only ever called once in the game, usually in some type of controller object in the first room or level - this is not always the case, but for the sake of simplicity, we'll be using this scenario for the following brief guide as it's the most common way to use particles. You do this because a particle system, once created, stays in memory and is ready to be used at any time, so if you create it more than once it can quickly increase the memory usage and cause serious lag, and even has the potential of crashing the game. For the sake of simplicity in this guide, you will make a global particle system that can be used by any instance in the game at any time.
Creating A Particle SystemCreating A Particle System
To start with you need to define the particle system and give it a name so that you can use it. As this is going to be a global system that any object can use you would do this in a controller object or an initialisation function run at the start of the game. The GML Code would look like this:
global.P_System = part_system_create_layer("Instance_Layer", false);
And using GML Visual:
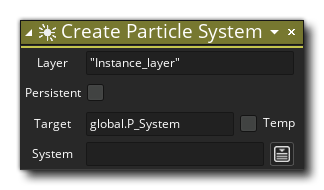
NOTE The layer name supplied must be a valid layer in the room where the system will be used, otherwise no particles will be visible. Also note that we set the persistent flag (both in code and in GML Visual) to false. A persistent particle system is one that will "persist" across rooms without the need to destroy and re-create it for each room. However, to keep things simple for this guide, we'll not be using persistence.
So that's the system created, but what about the particles? We have to define them too or the system is useless and does nothing.
If you already have a Particle System Asset, you can create it using the above function/action by passing the asset into the partsys/"System" argument.
Defining A Particle TypeDefining A Particle Type
To use a particle in a system you have to first define its general properties. These are like object properties, but they only apply in a general way to individual particles. What this means is that if you give the particles a minimum movement speed of 1 and a maximum movement speed of 2, any particle created by the system will have a random speed between 1 and 2 pixels per step, and that overall they will have an average speed of 1.5. You should name and add your first particle to the system using the following GML in the same object that you used to create the system:
global.Particle1 = part_type_create();
And for those of you that use GML Visual:
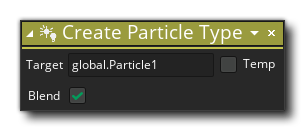
NOTE Using GML Visual we also tick the blend option. This enables additive blending for the particle, which we'll discuss a bit further down.
You now have a system and a particle to put in it, but you're not ready yet to create your outstanding effects! You still have to define the properties of the particle, ie: how it looks - its speed, its rotation, its alpha, etc. There are a lot of details that can be used to define a particle effect, so below is an overview of the most important settings and then a snippet of code and GML Visual that uses all of them:
- shape: The shape of the particle is the built in sprite that it will use, with the default being the constant pt_shape_pixel. There is also a function to add a custom particle if required - part_type_sprite - or the action Set Particle Sprite.
- size: Sets the size parameters for the particle type. You specify the minimum starting size, the maximum starting size, and the size increase in each step (use a negative number for a decrease in size). This is a scalar value that will modify the base image x/y scale equally.
- colour: Sets the colour for the particle if a single colour is used. If two or three colours are supplied this will be the colour blend, blending from one to the other over its lifetime.
- alpha: Sets the alpha value for the particle between a value of 0 and 1. If a single value is passed in this will be the alpha of the particle, if two or three values are passed in then the alpha will blend between these over the lifetime of the particle.
- speed: Sets the speed properties for the particle type. You specify a minimum and maximum speed and a random value between the given bounds is chosen when the particle is created. You can indicate a speed increase in each step, and even use a negative number to slow the particle down (the speed will never become smaller than 0).
- direction: Sets the direction properties for the particle type. Again you specify a range of directions (in counterclockwise degrees - 0 indicates a motion to the right, 90 indicates a motion upwards, etc...). For example, to let the particle move in a random direction you'd choose a minimum of 0 and a maximum of 360 as values. You can specify an increase in direction for each step too (can also be negative).
- orientation: Sets the orientation angle properties for the particle type. You specify the minimum angle, the maximum angle, and the increase in each step. You can also indicate whether the given angle should be relative to the current direction of motion or absolute, e.g: by setting all values to 0 but relative to true, the particle orientation will precisely follow the path of the particle.
- blending: Sets whether to use additive blending or normal blending for the particle type. This is set in a function when using GML Code and as part of the particle initialisation when using GML Visual. Additive blending means that the particles will use the bm_add blend mode, giving them a "glowing" look where they overlap, and also blending them with anything drawn underneath (sprites, backgrounds, tiles, etc.) - very useful for fire and magic effects (for example), but best left off for something like smoke. Experiment to see the differences! Note that enabling this will break the texture batching when particles are created, and so more batches will be required per step to draw them - something to consider as it may affect performance, especially on mobile.
- life: Sets the lifetime bounds, in steps (game frames) for the particle type. Like previous settings, this has a minimum and maximum value and particles will last a random number of steps within these values. So, a lifetime of 30 min and 30 max will have the particle existing for exactly 30 steps, but a lifetime of 20 min and 60 max will have each particle exists for a random number of steps between 20 and 60.
Now, before we present you the code for defining the particle, let's just talk about "wiggle" for a moment... Believe it or not, "wiggle" is a particle property and can be set for many of the above settings individually. When you see "wiggle" as an argument for a particle function or action, it means that if you place a number between 1 and 20 the particle will "wiggle" or fluctuate between the min and max values for the property, with 1 being a slow wiggle and 20 being very fast. So a particle speed minimum of 2 and maximum of 5 with a wiggle of 20 will oscillate very quickly between the min/max speeds for the lifetime of each particle created.
NOTE There are other minor particle properties too which we don't cover here, just to keep things as simple as possible to start with. See the appropriate pages for full details of particle properties.
Let's look at some code that defines a particle now:
// This defines the particle's shape
part_type_shape(global.Particle1,pt_shape_pixel);
// This is for the size
part_type_size(global.Particle1,1,1,0,2);
// This sets its colour. There are three different codes for this
part_type_color1(global.Particle1,c_white);
// This is its alpha. There are three different codes for this
part_type_alpha1(global.Particle1,1);
// The particles speed
part_type_speed(global.Particle1,0.50,2,-0.10,0);
// The direction
part_type_direction(global.Particle1,0,359,0,20);
// This changes the rotation of the particle
part_type_orientation(global.Particle1,0,0,0,0,true);
// This is the blend mode, either additive or normal
part_type_blend(global.Particle1,1);
// This is its lifespan in steps
part_type_life(global.Particle1,5,30);
To create this same particle definition in GML Visual we'd need these actions:
 So that's it! We have now defined our particles and they are ready to be used.
Creating Particles Directly In-GameCreating Particles Directly In-Game
There are a couple of ways to create particles, and each has its pros and cons. You can use emitters to burst or stream particles, or you can create particles directly at a point. Which one you use really depends on what you are trying to achieve and the effect you are wanting to create, but we'll start with the easiest of the two, which is creating particles directly. In GML we'd use the following function:
part_particles_create(global.P_System, x, y, global.Particle1, 10);
and in GML Visual it'd be:
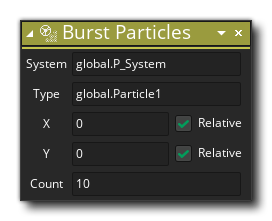 That single code/action above will create 10 particles at the given x/y coordinates of type "Particle1" from our global system. Simple! The great thing about that line of code/action is that it can be used anywhere without any fuss. For example if you place it in the Global Left Pressed event for the mouse in an object and change x/y values for the mouse_x/y position, it will create particles at the mouse position every time you press the button. Or if you have a rocket, then you could place this in the step event and have smoke particles coming every step (although 1 or 2 would probably be better than 10!). You can even have it create particles over an area by changing the x/y coordinates randomly, for example:
repeat(50)
{
var xx = x + 20 - random(40);
var yy = y + 20 - random(40);
part_particles_create(global.P_System, xx, yy, global.Particle1, 1);
}
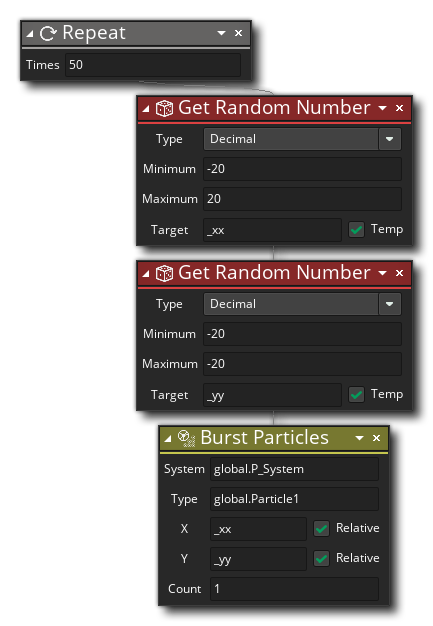 The above code will create 50 particles at a random position within a 40px square area.
Creating Particles With EmittersCreating Particles With Emitters
Since we've explained the easy way to create particles, let's now go the slightly more complex way, which is to use emitters. Emitters are another part of the particle system that has to be defined before being used, so we'll make a global emitter the same as we did for the system and the particles. We also have to decide whether to have a static (non-moving) emitter or not and whether we are going to burst or stream the particles, as well as decide over what area and what kind of distribution we are going to have the emitter use.
What does all that mean? Well, a static emitter is one that you can define once and forget about as it will not be moving anywhere for the duration of the game, ie: think of a log fire - it doesn't move, it just emits flames and so is static, but a fireball would require a dynamic emitter and will move across the screen. As for bursting or streaming, a burst is a one off explosion of particles, whereas a stream is just that - a constant stream of particles every step. For area and distribution, with emitters you can define an area for emitting particles (which can be a rectangle, ellipse, diamond or line) as well as the distribution curve (gaussian, inverse gaussian, or linear).
The following images illustrate the different types of area shape available for emitters:
And the distribution curves (linear, gaussian, and inverse gaussian) are illustrated here:

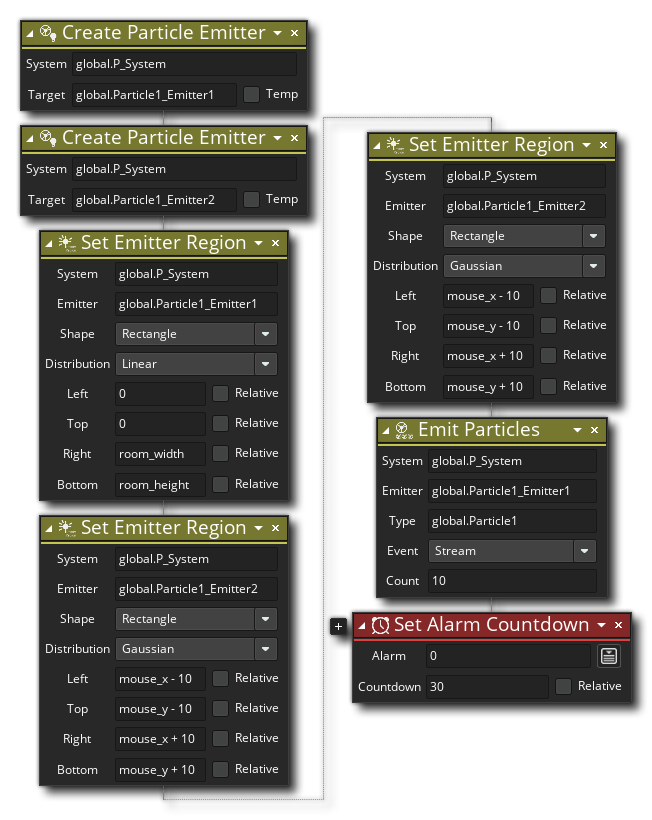
Below is an example of the code/actions required to define two emitters, which would normally go in the Create Event of a controller object, just after defining the particle system. One will be static and stream particles over the area of the whole room, while the other will be dynamic and follow the mouse and burst every 30 steps from a small ellipse:
global.Particle1_Emitter1 = part_emitter_create(global.P_System);
global.Particle1_Emitter2 = part_emitter_create(global.P_System);
// Set up the area that will emit particles
part_emitter_region(global.P_System, global.Particle1_Emitter1, 0, room_width, 0, room_height, ps_shape_rectangle, ps_distr_linear);
part_emitter_region(global.P_System, global.Particle1_Emitter2, mouse_x-10, mouse_x+10, mouse_y-10, mouse_y+10, ps_shape_ellipse, ps_distr_gaussian);
// Set the first to stream 10 particles every step
part_emitter_stream(global.P_System, global.Particle1_Emitter1, global.Particle1, 10);
// This can now be forgotten as it will function until told to stop...
// Set the alarm[0] event to burst the emitter2 particles...
alarm[0] = 30;
 So, here we are creating two particle emitters that are assigned to the particle system we created at the start. The functions/actions to create these emitters permit us to define an area in the room over which they will emit particles, as well as give the particle type to emit, and the shape and distribution to use within the defined area. The functions/actions will return a numeric value, which is the emitter ID value, and we store this in a variable so that we can use further emitter functions to target those emitters.
Now we have code/GML Visual to stream particles (these particles will be emitted every game step without us having to anything else), but we also want to add an Alarm[0] Event to burst particles at specific intervals:
part_emitter_region(global.P_System, global.Particle1_Emitter2, mouse_x - 10, mouse_x + 10, mouse_y - 10, mouse_y + 10, ps_shape_ellipse, ps_distr_gaussian);
part_emitter_burst(global.P_System, global.Particle1_Emitter2, global.Particle1, 30);
alarm[0] = 30;
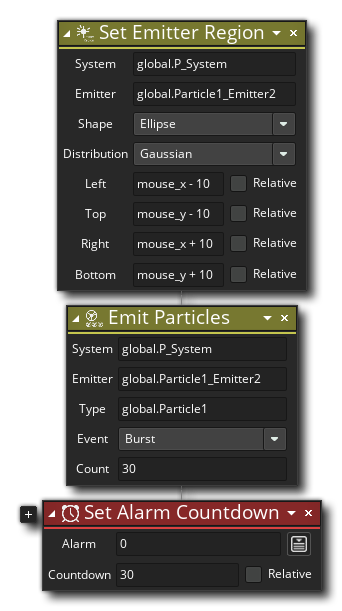 A particle burst is simply a one-off explosion of particles from the emitter, rather than a constant stream of them every game step.
But what if you want several objects to emit particles? A global emitter can only be in one place at a time, so you would need to create local emitters in each object. These emitters will still use the global particle system and any particles that are within it, but they can be different shapes and sizes and move with the object, making them ideal for rockets or bullets or things. The code you would use is exactly the same as above, but without the "global" prefix before the emitter names.
That's the creation of particles dealt with but there is one more thing that's very important... Cleaning up when you are finished with them.
Cleaning UpCleaning Up
As mentioned at the start, once created, a particle system (and its particles, emitters, etc.) are stored in memory for instant use. Great, but what happens when you restart the game? Or if your player dies and starts the room again? Well, if you don't manage the game right you get a memory leak. This is when something has been created and uses up memory, but has been "de-referenced" meaning that GameMaker no longer has access to it. This kind of thing will slowly eat up memory and cause lag in your game or even block the computer causing your game to crash, and it is a pretty common problem with first time users of particle systems.
How do you avoid this? Well, GameMaker has GML Code functions and GML Visual actions to delete particle systems and their emitters and particles from memory when not in use, and with a little bit of planning when using the following code/actions, you can easily prevent this potential problem.
The first thing you have to do is decide where you are going to create the system and how you will use it. You could create a global system in the Game Start Event of an object that is in your first room (like a menu or title screen), but this means that if you restart the game using the game_restart function, it will be recreated and cause a memory leak. Or you could create a local system in an instance in any room, but again, if you leave the room then the system will be inaccessible and cause a memory leak. To avoid this you would need to have something like this in the Game End Event or the Clean Up Event of your object:
part_type_destroy(global.Particle1);
part_emitter_destroy(global.P_System, global.Particle1_Emitter);
part_emitter_destroy(global.P_System, global.Particle2_Emitter);
part_system_destroy(global.P_System);
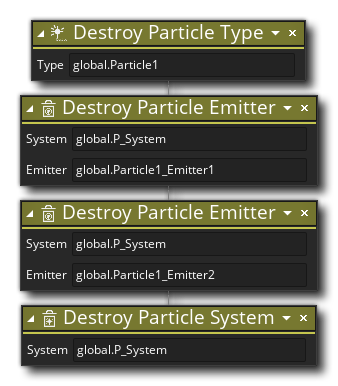 This will remove the defined particles, emitters, and then the system from memory ready for you to restart the game or change room. Just remember that after thinking about where would be the most suitable place to create the system, think about where would be the most suitable place to destroy the system too!
Now you know the basics about particles, particle systems and emitters, so you can now add them into your game! But before rushing off and adding particle effects to everything, please note that while particles are less CPU hungry than instances, they are not the solution to everything as they will cause lag if you have thousands of them at a time. The best thing to do is experiment and use them carefully to "flesh out" visually a game and give it a bit more eye-candy without over doing it.