Windows Game Options
This section outlines the different options available to you that control how your Windows game projects will be compiled. The different sections are:
General
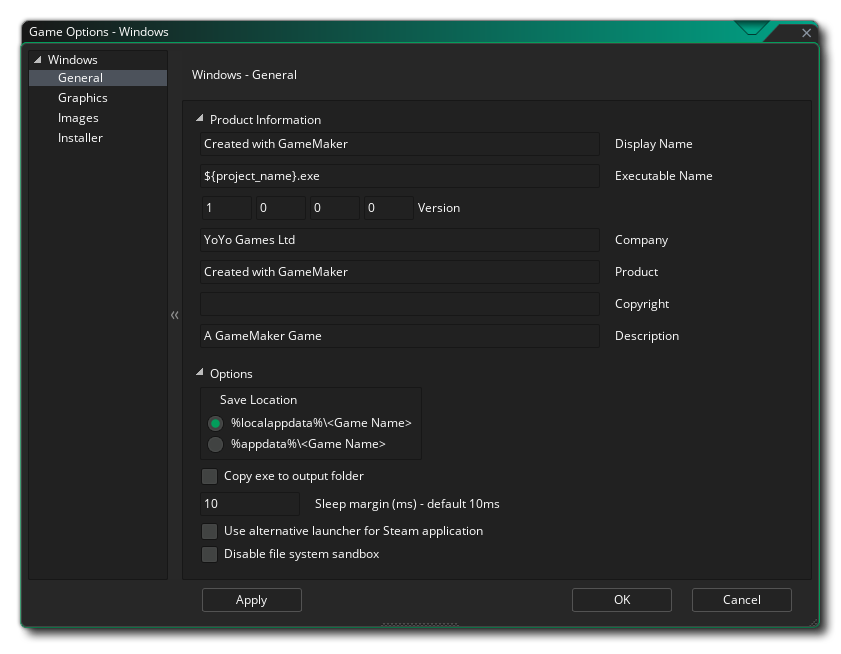 The General page for Windows games is where you should supply the necessary information for Windows to display when your game has been installed and is running. This information goes in the Product Information section, and should be filled out completely.
The Options section of this window permits you to choose where the game package is to be installed to, either the "%localappdata%" or "%appdata%" folders, as well as whether to set Copy exe to output folder. In general you should never need this option, but it is supplied for those users that have various DLL's that communicate with each other and your game, and when enabled it will maintain the game EXE in the output folder when testing, rather than place it in the Temp folder.
Next you can set the Windows Sleep Margin. This option is related to reducing stuttering when running your game on specific systems. Basically, if your game is running faster than your room speed GameMaker will "sleep" for the remaining time, but this sleep can be quite inaccurate and you can often end up sleeping for longer than necessary, causing your frame to take longer which causes stuttering. To get around this we can sleep for less time, then sit in a tight loop for the remainder of the time to make it more accurate - although the problem with sitting in a loop is that it causes CPU usage to increase, which in turn can cause your CPU temperatures to rise and your fan to run faster. By default, this value is set to 10, and in 99.99% of the cases you'll be fine with this, but for low end machines or for machines with a lot of background processes running this may not be an ideal solution (or for very high end machines too) and a value of 1 or 15 or something may be required. Note though that this is very much a system specific configuration and what works on your build machine may not be appropriate for another user, and as such if in doubt leave it set to 10.
NOTE In addition to the Sleep Margin, you can further control your performance and power consumption on Windows by adjusting the thread scheduler's resolution at runtime.
The next option is to Enable Steam for your game. If you enable this option, make sure you have the Steamworks SDK installed (see here), and that you have added the Steam App ID into the General Options for the game. Note that if you are running GameMaker on Windows and from the Steam version of the IDE and you are developing games for Steam, then you might also need to check the Use alternative launcher for Steam application option. What this option does is launch your game when testing using an alternative launcher program to prevent it being flagged by Steam with GameMaker's application ID instead of your game's own application ID. You should only enable this when developing for Steam and if you find you have issues launching your game.
The last option you have is the option to Disable file system sandbox. Checking this will disable the GameMaker sandboxing for saving and loading files, permitting your games to access files from anywhere on the system running the game. This option is unchecked by default, as we recommend that you maintain the GameMaker sandbox for files on all systems and when checked, some save/load areas may still not be available depending on the OS-level permissions. For more information on the sandbox, please see the pages on the GameMaker File System.
Graphics
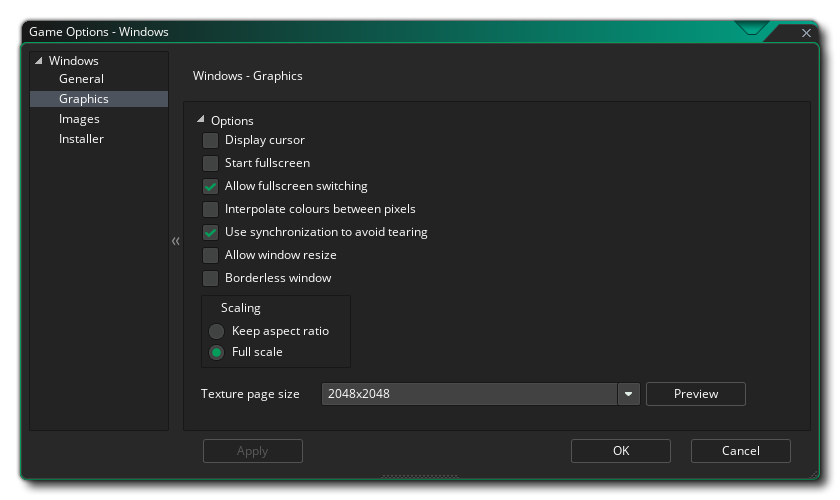 The graphics options are those that you should configure to determine how your game will use the graphics card of your target Windows PC. The following options are included for you to modify:
- Display Cursor: When this is checked the regular windows cursor will be show, and unchecking it will mean that no cursor is shown unless you have created one in your game code. This is on by default.
- Start Fullscreen: If this is checked, the game will start in fullscreen mode otherwise it will start windowed. This is off by default.
- Allow Fullscreen Switching: With this ticked the user can switch from fullscreen to windowed and back again using the standard Windows shortcuts. This is off by default.
- Interpolate colours between pixels: Turns on linear interpolation, which basically "smooths" pixels. For crisp pixel graphics, it should be off, but if you have nice alpha blends and smoothed edged graphics it is better left on.This is on by default.
- Use synchronization to avoid tearing: This toggles v-sync on or off. Note, that if you have a game with a room speed of 120 and the player has a monitor with a refresh rate of 60, turning this option on will lock your game speed to 60 too. This is off by default.
- Allow window resize: Checking this permits the user to change the size of the game window (the Borderless Window option needs to be off for this to work). This option is off by default.
- Borderless Window: Checking this will make your game run with a borderless window, removing the normal minimise, maximise and close buttons as well as the game title. This is off by default.
- Scaling: Here you can choose to maintain aspect ratio (so a 4:3 room will be "letter boxed" on a 16:9) or to scale fully (stretching the image to fit the full screen).
WARNING Switching off the application surface will disable all the scaling options set in the Windows Game Options until it has been switched back on again. See The Application Surface for further details.
Finally there is the option to set the size of the texture page. The default (and most compatible) size is 2048x2048, but you can choose from anywhere between 256x256 up to 8192x8192. There is also a button marked Preview which will generate the texture pages for this platform and then open a window so that you can see how they look. This can be very useful if you wish to see how the texture pages are structured and to prevent having texture pages larger (or smaller) than necessary. For more information on texture pages, please see Texture Pages.
NOTE Be aware that the larger the size of the texture page, the less compatible your game will be on PC's with lower specifications.
Images
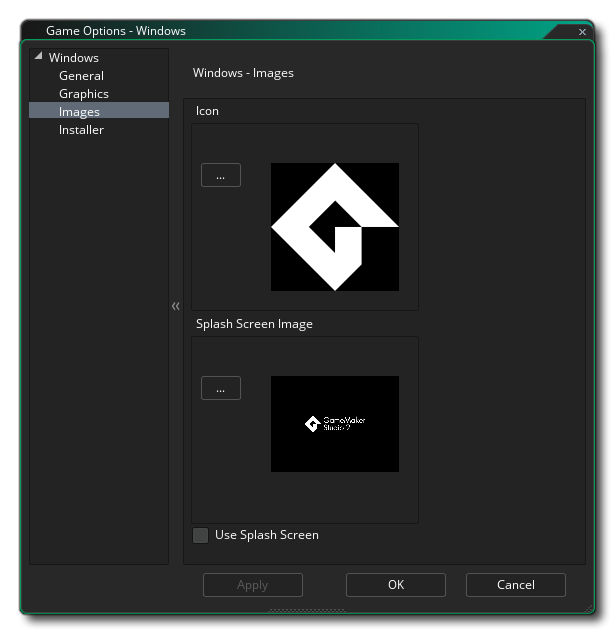 The images section is where you supply the images that your game requires. For Windows, you need to supply an Icon file (that must be in .ico format) and also a splash screen (which can be .png, .bmp, .jpg or .gif format - note an animated GIF will be converted into a static image). The splash screen will be shown while the game loads, and can be enabled or disabled by checking the Use Splash Screen option (which is off by default).
It is worth noting that GameMaker has a Project Image Generator tool which can be used to automatically create all the images required for all the different target platforms your game is being compiled to. If you use this tool, you should revise the images created to ensure that they are what you require.
Installer
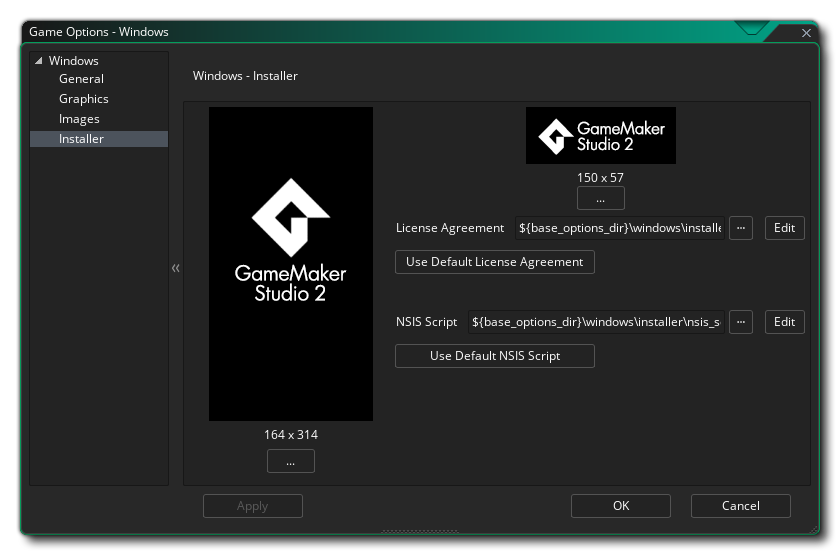 Windows games can be created with an installer and here you can define the various settings and graphics that GameMaker will use when creating it. First of all we have the graphical options which will define the look of the installer itself:
- Finished: The graphic that appears on the "Finished" page of the installer. Must be in *.bmp format and measure 164x314px.
- Header: The graphic that appears while the installer is running. Must be in *.bmp format and measure 150x57px.
NOTE These images must be 24-bit, they cannot have an alpha channel.
You can also point to a specific License Agreement file (an example is supplied with GameMaker) and a custom NSI script file (details in the NSIS Users Manual) should you need one, or click the appropriate buttons to return to the default files supplied with GameMaker.