Texture Pages
When you create a game with GameMaker, you will surely have created graphics - Sprites, Tile Sets and Fonts - to go along with it. These graphics are stored on Texture Pages which GameMaker builds for you from all the image assets that your game contains. Below is an example of a complete texture page:
 As you can see, the game graphics are all jumbled up together in such a way that they all fit on a power of 2 sized page, e.g. 512x512, 1024x512, etc., up to a maximum size of 4096x4096 pixels per page. Note that the maximum size of a texture page will depend on the chosen export platform, as some targets will not permit pages larger than 2048x2048px, and even then, the maximum available size may not be optimal for all the devices that use the target platform OS.
Note too that if your images have a lot of empty space (i.e.: transparent pixels) around them, then they will be cropped by default to remove any of these "invisible" pixels and pack as many images as possible onto a single texture page. If this is not what you wish to happen, then you need to disable it from the Texture Groups window.
It is important to understand how the different available texture settings will affect an image, so let's look at the Sprite Editor section titled Texture Settings, shown below:
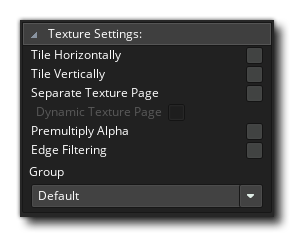 Here you can define how the image is to be stored on the texture page, as well as whether it has to be stored separately. You can also set which texture page it has to be assigned to as well as a few other options (explained in depth on the Sprite Editor page).
Tile Horizontally & Tile Vertically
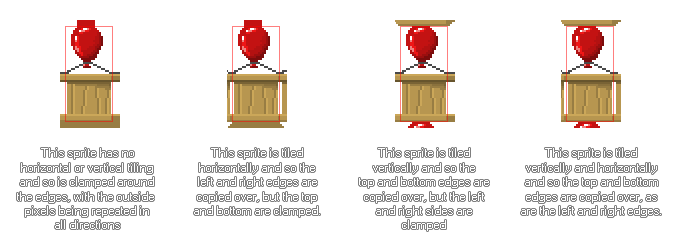
These relate to how the edges of the image will be created when placed on the texture page.
An image that is to be tiled will have the edges (horizontal or vertical) added to by the edges from the opposite side, while if no tiling is selected the sprite will be clamped and the edge's pixels will be repeated (note that tilesets also have a setting for the output border width, found in the Tile Set Properties which does the same thing, only for each tile in the set). The following image illustrates this:
Separate Texture Page
Underneath those settings is the Separate Texture Page setting. This option will force GameMaker to place this image on its own unique texture page and there are no options associated with this as the tiling or clamping is controlled directly through code. This is most commonly used for texturing 3D models (in which case the texture should be a power of 2, eg: 128x128, 512x512, 256x1024, etc.), but you can use it to force any image to be drawn to its own unique page.
NOTE Take care when using this option as you can quickly use up all the available texture memory, especially on mobile devices, if you have too many texture pages.
If you assign the sprite a separate texture page, you can also set whether it's dynamic or not.
You can also set which Texture Group the sprite is assigned to.
It should be noted that in the individual platform tabs that can be found in the Game Options there is a button that permits you to view the texture pages that you have defined, just as they would be created for each target. This is very handy for working out how many pages are being created and what's on them.
Should you have a texture in your game that is larger than the maximum selected texture page size, then this will be scaled down by half (and half again if necessary) until it fits on the maximum page size. It will not be split into sections over various texture pages. This means that when you test your game on Windows, Ubuntu (Linux) or MacOS the game may look fine as you are using larger texture pages, but on iOS (or any of the other targets that require a smaller texture page size for optimal performance) the texture may look blurred or have artefacts. It is essential that you make sure your images are all able to fit on the smallest of the texture page sizes that your game will use, and if not then you should split them into smaller images and then draw them together in your game to give the illusion of one large, complete, image.
NOTE Before you go off splitting up your graphics over various texture pages, you should be aware that this is not always necessary, nor is it always the most efficient way to work. Some games may be more CPU bound than GPU bound (see the section on Debugging for more information) and those games will not benefit greatly from this optimisation, and you should also consider whether it would not be better to have all your images on two texture pages and swap between them rather than spread out over several, which is just wasting memory.