 The Texture Group Manager is available from The Tools Menu in the IDE. Here you can add, delete and rename Texture Groups.
The Texture Group Manager is available from The Tools Menu in the IDE. Here you can add, delete and rename Texture Groups.
GameMaker permits you to assign each of the graphics assets in your project (Sprites, Tile Sets, and Fonts) to different texture groups, to optimise the number of texture swaps that the hardware does at any given time in your game.
For that to work, you need to define the necessary texture groups from this window, and then go through the asset list and assign groups to them.
Before we dive into creating and editing Texture Groups, let's understand how they're loaded.
A Texture Group is loaded into RAM when the game starts, unless it's a Dynamic Texture Group, which is loaded later.
While in RAM memory, the Texture Group stays compressed, as it was on disk.
When an image from a Texture Group is drawn or one of the pre-fetch functions is run, all texture pages of the Texture Group are loaded into VRAM. For most texture group formats the texture is first decompressed before being loaded into VRAM. If you're using a Custom texture group format, however, the texture is decompressed in real time on the GPU.
NOTE Texture decompression is asynchronous on all platforms except GX.games, which might cause stutters as textures are decompressed in-game. To avoid this, ensure your textures are prefetched during loading screens or other inactive parts of your game.
You can flush a Texture Group to remove it from VRAM (this doesn't remove them from RAM).
By default all images in your game will be added to the "Default" texture group, which always exists. You can click on the Add New button to create a new texture group, and if you select the name of the group you can change it to something appropriate.
To start with, the group will show "This group is empty" for each section of the group (Sprites, Tile Sets and Fonts). Add an asset using the Add Asset button at the bottom, or by selecting multiple assets in the list and right-clicking to move those assets into a different group:
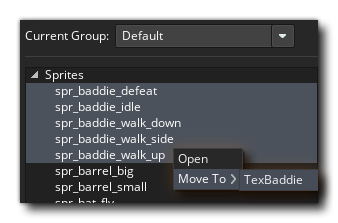 Alternatively you can add assets to a texture group via the right mouse button
 ![]() menu in The Asset Browser. You can select one or more Sprite/Tile Set/Font assets and then use the RMB menu to add the assets to any group, as shown below for Tile Sets:
menu in The Asset Browser. You can select one or more Sprite/Tile Set/Font assets and then use the RMB menu to add the assets to any group, as shown below for Tile Sets:
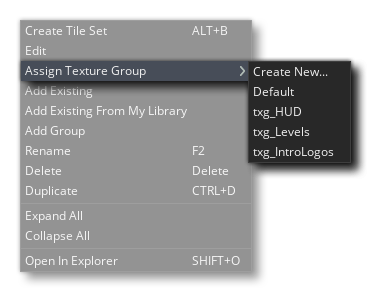
Texture groups other than the "Default" one can also be deleted at any time, which will move their contents into the "Default" group.
NOTE If you delete a group by mistake you can use ![]() /
/ ![]() + "Z" to undo the action.
+ "Z" to undo the action.
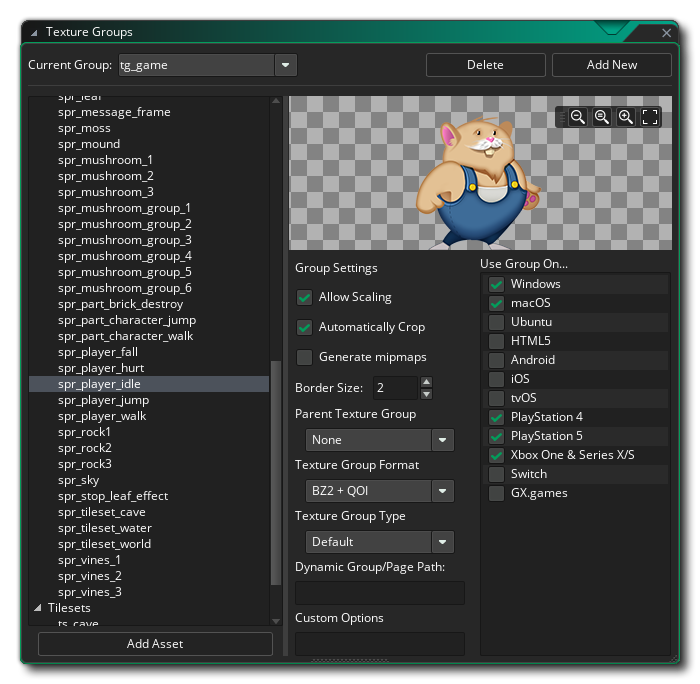
Once you have added assets into a Texture Group, you will see them listed on the left of the main Texture Group editor window, and clicking on any of the sprites in this list will show them in the image preview window on the right. This is particularly helpful when working on large projects and you need to be able to see which images have been assigned to which group.
If the images assigned to the group have multiple sub-images (i.e. they are animated), then only the first sub-image is shown in the preview window. You can also right click ![]() on an asset to open a small menu giving you the option to move it to another texture group or open the editor for that asset.
on an asset to open a small menu giving you the option to move it to another texture group or open the editor for that asset.
Even though the assets are shown in the list as being separate, all sprites, tile sets and fonts will be added to the same texture page, as long as there is room on that texture page. If the texture page is full, GameMaker adds the remaining assets to another texture page (or pages). So by default you cannot get an individual page for each asset type. The only exception to this rule is when you flag a sprite asset as being for a "Separate Texture Page", in which case it will be given its own individual texture page (see the section on "Texture Settings" in The Sprite Editor for more details).
A single texture group can have multiple texture pages -- they are not equivalent.
If your game has a lot of unique graphics for each level, then you may define a single texture group for each of the levels, but the group's graphics may require two or more texture pages. This depends on whether the selected texture page size (in the Game Options for your target) is able to fit all the graphics within a texture group.
See: Texture Pages
The textures in a texture group are compressed using the format set under Texture Group Format. They can be decompressed before being sent to VRAM or in real time by the GPU.
See: Texture Compression
You can set up Dynamic Texture Groups, which can be loaded and unloaded at runtime to save memory.
See: Dynamic Textures
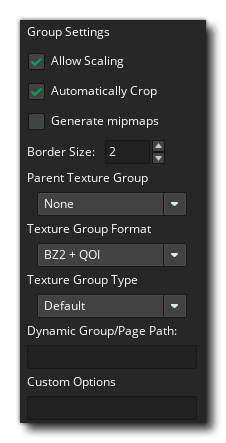
The group settings in the Texture Group Editor are used to determine exactly how the texture pages for a given group should be created, with the following options available:
NOTE Child texture groups are stored in the same texture group format as their parent, since the assets they contain are added to a texture page of the parent group.
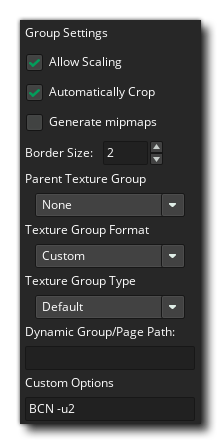
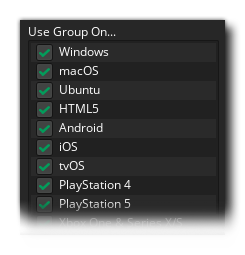 Other than those settings you can also choose whether to export any given texture group to any given platform by simply checking or unchecking the appropriate boxes from the Use Group On... section of the window. Note though that the <Default> texture group is always exported to every platform, and you can't check/uncheck any of them (only custom texture groups permit this).
Texture Groups are also linked to the Configurations settings. What this means is that you can define texture groups for each individual configuration of your game, and then set the sprite, tile set or font resource assignments to these different groups and it will be "remembered" when you change to a different configuration. The same will happen to any export options that you have chosen in the Texture Group window, so you can set the texture groups to export to specific platforms on a per-configuration basis.
One use for this is, for example, that you could make an iPad configuration and for that create 2048x2048px texture pages (setting this up via the Game Options). You would then assign all the graphics assets to the appropriate texture group, and when finished, you would then change to a different configuration (for HTML5, for example) and from the Texture Group window, create new texture groups that are 512x512px, assigning the assets to these new groups. There is also a button at the bottom of the page that permits you to copy texture group settings from one configuration to another.