To create an extension for Android you have to do it in two parts. The first part would be to add the extension itself, along with the required files, and the second is to create the functions and macros/constants that the extension requires.
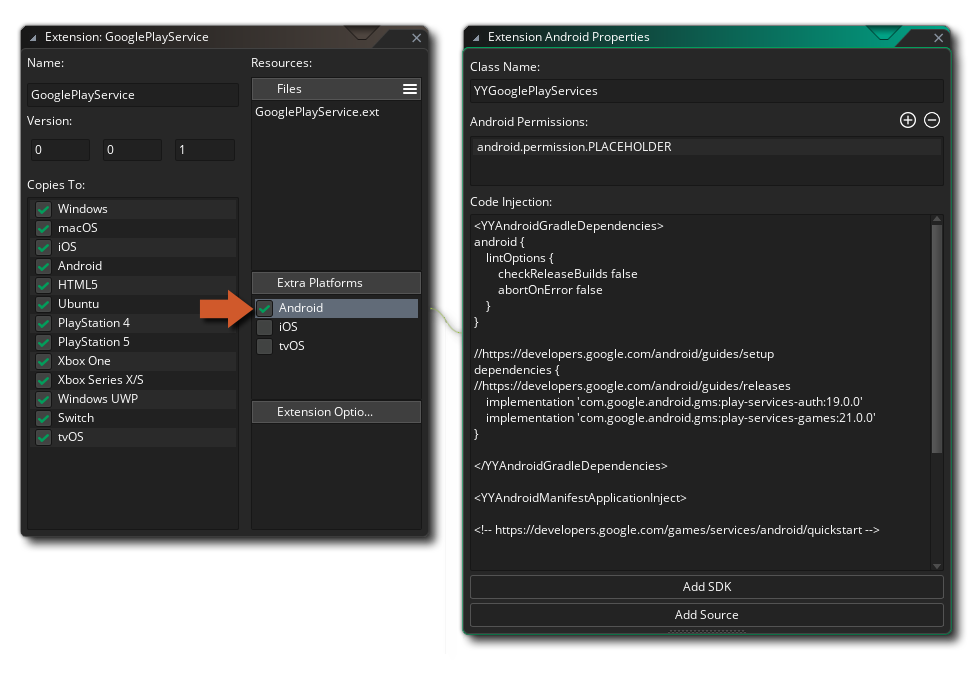
The functions and constants are added using placeholder files to group them together, so you'd add a placeholder and then define the functions and macros as explained in the previous section. To add the rest of the files though you would need to first tick the Android check-box in the Extra Platforms section of the editor, which will open up the extension's Android Properties:
Here you can give the following details:
Any code entered into the "Code Injection" window will need to be separated into distinct XML groups, as shown in the screenshot above. The XML tag you use for a group will determine where the code is injected into your application.
You can use the following syntax to create code injection groups:
<YYTagName>
// Code to inject
</YYTagName>
The following tags are available for the Android platform:
YYAndroidTopLevelGradle
YYAndroidTopLevelGradleBuildscript
YYAndroidTopLevelGradleBuildscriptRepositories
YYAndroidTopLevelGradleBuildscriptDependencies
YYAndroidTopLevelGradleAllprojects
YYAndroidTopLevelGradleAllprojectsRepositories
YYAndroidTopLevelGradleEnd
YYAndroidGradle
YYAndroidGradleEnd
YYAndroidGradleAndroid
YYAndroidGradleDependencies
YYAndroidGradleProperties
YYAndroidManifestAttributes
YYAndroidManifestApplicationAttributes
YYAndroidManifestActivityAttributes
YYAndroidManifestActivityInject
YYAndroidManifestApplicationInject
YYAndroidStringValuesInjection
YYAndroidLayout
YYAndroidProguard
YYAndroidLogcat
The runtime location where the code is injected will depend on the type of the tag:
| Tag Type | Injection Path |
|---|---|
| Top Level Gradle | {RUNTIME}\android\runner\RootFiles\build.gradle |
| Module Level Gradle | {RUNTIME}\android\runner\ProjectFiles\build.gradle |
| Android Manifest | {RUNTIME}\android\runner\ProjectFiles\src\main\AndroidManifest.xml |
| Strings | {RUNTIME}\android\runner\ProjectFiles\src\main\res\values\strings.xml |
| Layout | {RUNTIME}\android\runner\ProjectFiles\src\main\res\layout\main.xml |
NOTE These paths are only for VM; for YYC, injected code will go into the {RUNTIME}\yyc\ directory, where the paths may or may not be equivalent to those for VM.
You can inject code conditionally, depending on the value of one of the Extension Options.
Inside a code injection group, use toInject with the required option in condition:
<YYIosPlist>
<toInject condition='${YYEXTOPT_MyExtension_ShouldInject}'>
...
</toInject>
</YYIosPlist>
This will only inject the code between the toInject tags when the option YYEXTOPT_MyExtension_ShouldInject is true. The option should be of the Boolean type.
You can also check against a specific value by specifying it in the match attribute:
<YYIosPlist>
<toInject condition='${YYEXTOPT_MyExtension_ShouldInject}' match='FooBar'>
<string>This content is injected IF condition == match</string>
</toInject>
</YYIosPlist>
This will only inject the code between the toInject tags when the option YYEXTOPT_MyExtension_ShouldInject is equal to "FooBar". This allows you to match against a value of any type, as this check is done at compile time when all extension option values are provided as strings.
Also see: Using Extension Options
Within the text files added to your extension (see: Adding Files), you can inject code from the Code Injection window by mentioning a tag inside ${ }. For example, say you have a file with the following contents:
<?xml version="1.0" encoding="UTF-8"?>
${YYAndroidMyInjectionTag}
IMPORTANT You can create your own tags for this use. Such custom tags must start with YYAndroid.
The ${YYAndroidMyInjectionTag} part here will be replaced with the contents of the <YYAndroidMyInjectionTag> </YYAndroidMyInjectionTag> group from the extension's Code Injection window.
You can create a folder called "ProjectFiles" in the folder of your extension (alongside its .yy file). Any files placed in this folder will be moved to the root of the generated Android project at compile time, and can also take injection tags as described above.
Once you have set this up correctly, you will need to add the files required for your extension package to work. To do this you need to click on the buttons at the bottom, either Add SDK or Add Source and then browse to the files you wish to add. Added files will be stored in the AndroidSource directory along with your extension. You can open this location at any time by right clicking ![]() on the extension and selecting Open in Explorer.
on the extension and selecting Open in Explorer.
For information on your creating native extensions for Android, see Source Examples.