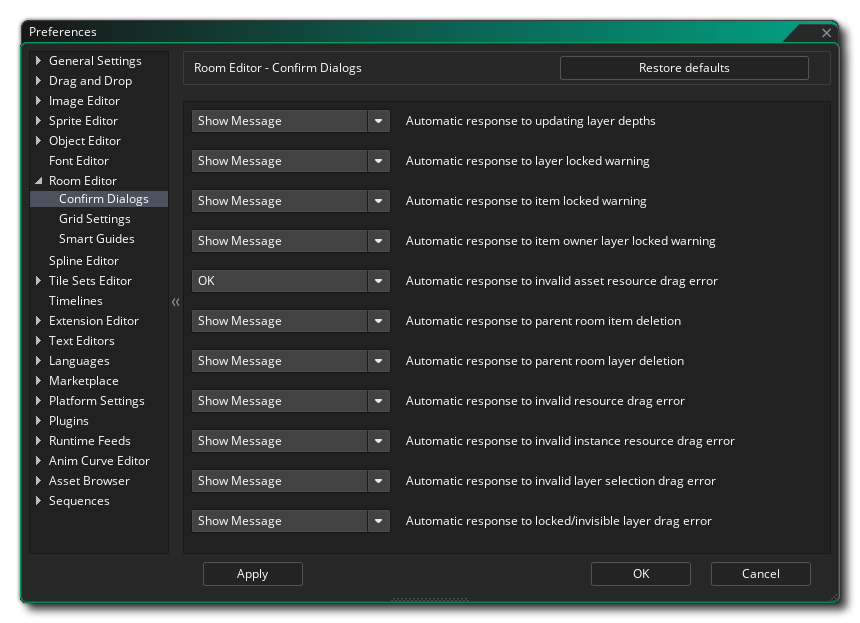
The Confirm Dialogs preferences are used to change the messages that are shown in the room editor when you perform certain actions. The messages you can change are:
- Automatic response to updating layer depths: hen you change layer depths a message is shown to warn you that doing this will also automatically update all the other layer depths. With this option you can choose to have the message show, have it update the layers as if you'd clicked "Ok", or have it not update anything as if you'd clicked "No".
- Automatic response to layer locked warning: If you try to delete a layer in the room and it happens to be locked, you will be shown a message by default. However setting this option to "Ok" will not show the message and just not let you delete the layer.
- Automatic response to item locked warning: If you try to delete an item it happens to be locked, you will be shown a message by default. However setting this option to "Ok" will not show the message and just not let you delete the item.
- Automatic response to item owner layer locked warning: If you try to delete an item on a layer and the layer happens to be locked (even if the item is not), then you will be shown a message by default to inform you that it can't be done. However setting this option to "Ok" will not show the message and just not let you delete the item.
- Create new asset layer when dragging sequences/sprites onto unsuitable layers: If you try to add a sprite (or a sequence) to a layer that is not an asset layer, then you will be shown a message by default to inform you that it can't be done and ask if you want to create a new asset layer for the item being dragged. However setting this option to "Ok" will not show the message and automatically create a new layer for sprites (and sequences).
- Automatic response to parent room item deletion: Here you can choose what happens when you delete an item that is part of a parent room (and so present in all child rooms). The default is to show you a warning message and let you decide what to do, but you can set it to "Delete All" to suppress the message and go ahead with the item delete from the parent room and all its children, or you can select "Keep All" to suppress the message abort the delete.
- Automatic response to parent room layer deletion: Here you can choose what happens when you delete a layer that is part of a parent room (and so present in all child rooms). The default is to show you a warning message and let you decide what to do, but you can set it to "Delete All" to suppress the message and go ahead with the layer delete from the parent room and all its children, or you can select "Keep All" to suppress the message abort the delete.
- Automatic response to invalid asset drag error: If you try to add an asset to a layer that is not designated as being for that asset type (like adding a path to an instance layer), then you will be shown a message by default to inform you that it can't be done. However setting this option to "Ok" will not show the message and just not let you add the asset. Note that this option does not apply to instances, sprites or sequences.
- Create new instance layer when dragging objects onto unsuitable layers: If you try to add an object instance to a layer that is not an instance layer, then you will be shown a message by default to inform you that it can't be done and ask if you want to create a new instance layer for the item being dragged. However setting this option to "Ok" will not show the message and automatically create a new layer for the instance.
- Automatic response to invalid layer selection drag error: Here you can choose what happens when you drag a resource onto the room editor when you have selected multiple layers in the layer editor (or have not selected any layer at all). The default is to show a warning message but you can set this option to "OK" to suppress the message and continue, without adding any resources.
- Automatic response to locked or invisible layer drag error: Here you can choose what happens when you drag a resource onto a layer that has been locked or is flagged as invisible. The default is to show a warning message but you can set this option to "OK" to suppress the message and continue, without adding any resources.
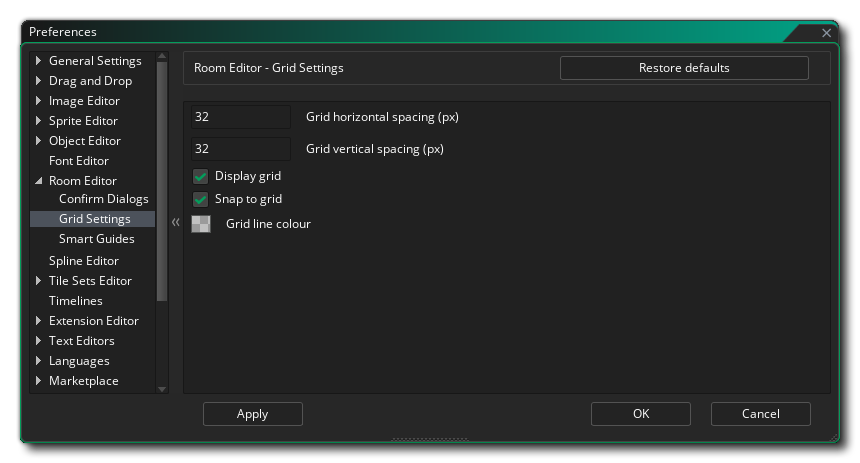
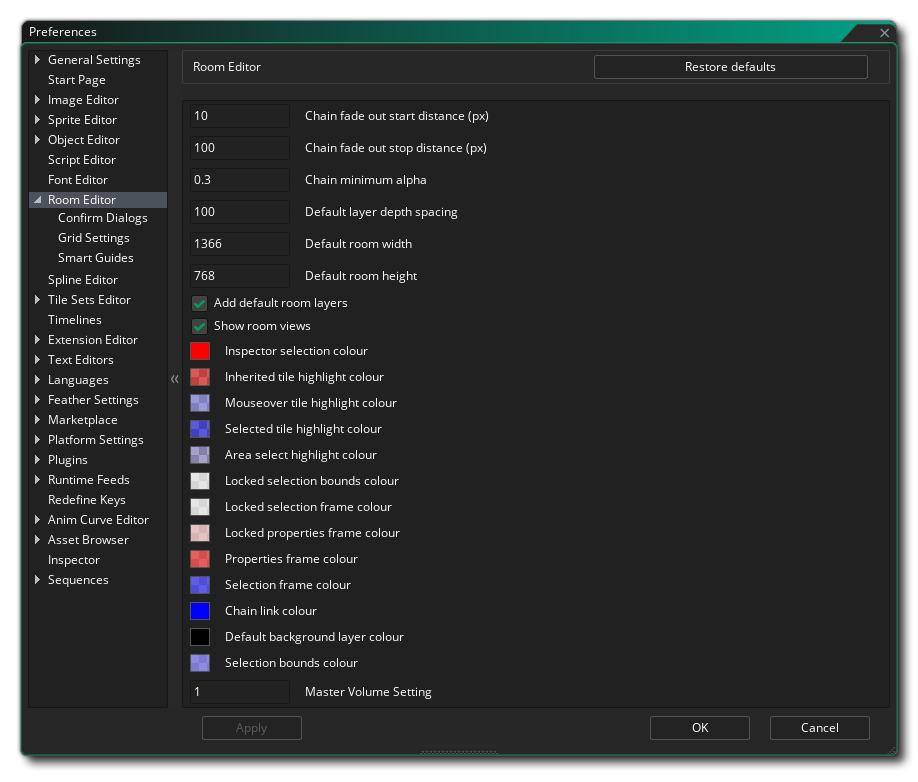
The Grid Settings preferences are used to change how the grid overlay works, with the following options available:
- Grid horizontal spacing (px): This will set the horizontal space for gird cells of the room grid in pixels. Default value is 32px.
- Grid vertical spacing (px): This will set the vertical space for gird cells of the room grid in pixels. Default value is 32px.
- Display grid: This option will toggle on or off the room grid when you first open a room. It is on by default, but even if it is switched off you can enable it again using the appropriate button in the room editor itself.
- Snap to grid: With this option you can set whether a room will have assets snap to the room grid by default or not when a room is initially opened. It is on by default, but even if it is switched off you can enable it again using the appropriate button in the room editor itself.
- Grid line colour: This option permits you to set the colour (including the alpha component) of the room grid lines. The default value is ( ARGB) #30FFFFFF.
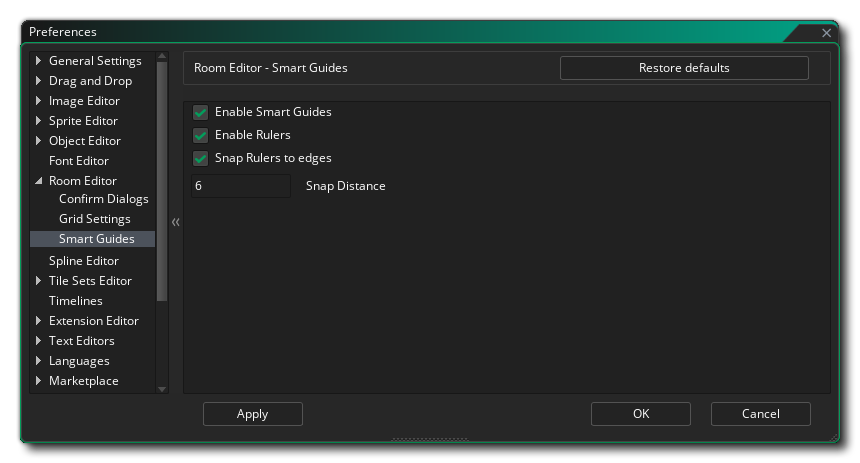
This section details the Smart Guides Preferences for the Room Editor. The available options are:
- Enable Smart Guides: This is used to enable/disable the use of smart guides in the Room Editor. Default is enabled.
- Enable Rulers: This option will enable/disable the side rulers in the Room Editor. Default is enabled.
- Snap Rulers To Edges: When enabled, this option will snap guides dragged into the Room Editor from the rulers to any assets placed in the room. Default is enabled.
- Snap Distance: This setting tells the Room Editor at what distance a guide has to be from an asset before it will "snap" to the side of the asset. Default value is 6px.