 What your sequences do is governed by the assets and parameters that have been added to the Track Panel. You can add a track to the editor by either:
What your sequences do is governed by the assets and parameters that have been added to the Track Panel. You can add a track to the editor by either:
This last method will open the Asset Explorer for you where you can choose the asset to add.
Regardless of the method you choose, a new asset track will be made for the asset. This track is the main track for the asset in the sequence and will have a corresponding asset key track created for the asset in the Dope Sheet at the playhead position:
 Note that the colour of the Asset Key in the Dope Sheet can be set from the Track Panel by clicking the coloured bar at the end. This will open up the Colour Picker where you can choose which colour to use for the key tracks in the Dope Sheet.
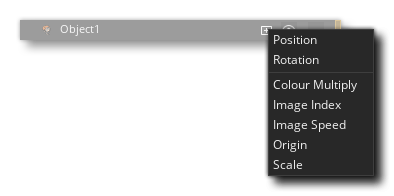
Each asset in the track editor can also have a set of parameter tracks added to it. These tracks are what control the various different properties (parameters) that can be modified for the track over time. The different parameters available are covered in depth in the section on "Adding Parameter Tracks" further down this page, but to give you an idea of what's available here is a brief list:
To add a parameter track in the editor you can enable "Automatically Record Changes" ![]() in the Track Panel, which will then add parameter keys for any changes you make to an asset in the Canvas at the current playhead position, as shown here:
in the Track Panel, which will then add parameter keys for any changes you make to an asset in the Canvas at the current playhead position, as shown here:
 Alternatively, you can click the "Add Parameter Track"
 ![]() button, which will open up a menu showing you the different options available:
button, which will open up a menu showing you the different options available:
 Selecting any option from this menu, or recording directly from the IDE, will create one or more parameter tracks underneath the main asset track, and also add a parameter key to the Dope Sheet, coloured the same as the main asset track colour:
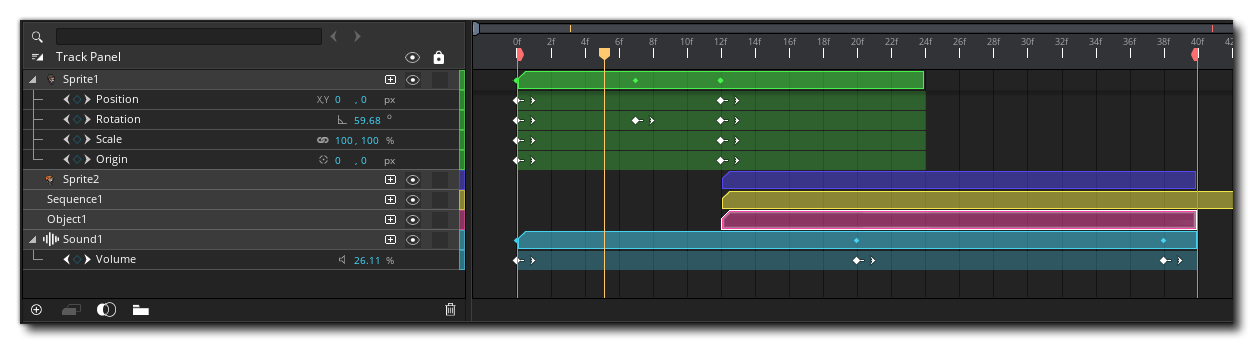 Once you add a parameter track to your main asset track, the dope sheet will have a coloured bar to show the length of the asset track in frames, and there will be parameter keys (keyframes) added at the points where you want a change in the parameter to occur. These keys can be seen in the above image as simple "dots" on a frame. When a track has parameter keys like this, the parameter they refer to will be interpolated (using linear interpolation) by default between each of the points shown. For example, if you have a rotation parameter and at frame 0 it is set to 90° then at frame 30 it is 180°, then at frame 15 it will be 135°. You can actually see the change in values over time by selecting the parameter track and then "scrubbing" the playhead in the dope sheet:

Note that for all parameter tracks you can disable the default linear interpolation between different keys from the right mouse button ![]() menu on the parameter track, which means that transitions between parameter values will occur instantly on the given frame rather than gradually over time:
menu on the parameter track, which means that transitions between parameter values will occur instantly on the given frame rather than gradually over time:
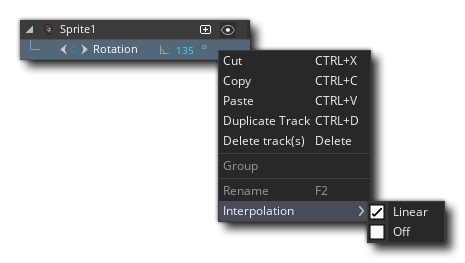 Apart from being able to choose the transition type for parameter tracks, the RMB menu also offers you the following options:
An important feature of asset and parameter tracks is the ability to parent tracks and groups. If you drag an asset track onto another one in the track panel, the first asset becomes a child of the asset it was dropped on, which in turn becomes the parent. All parameter tracks assigned to the parent asset track will then automatically be applied to the child asset tracks, so you can have multiple sprites (for example) all using a single position asset track to move: The same can be done using groups. You can create a group folder by clicking the button at the bottom of the track panel and then drag the asset tracks you want to be grouped together on the group folder. These assets will still retain their own parameter tracks, but you can then give additional parameter tracks to the group and all the assets in the group will be affected by these parameter tracks as well as their own individual parameter tracks.
When working with the track panel the usual keyboard shortcuts can be used too, i.e.: ![]() /
/ ![]() and the left mouse button
and the left mouse button ![]() to select one or more tracks in any order,
to select one or more tracks in any order, ![]() and the left mouse button
and the left mouse button ![]() to select consecutive tracks, and you can also cut, copy and paste them using the
to select consecutive tracks, and you can also cut, copy and paste them using the ![]() /
/ ![]() +"X",
+"X", ![]() /
/ ![]() + "C" and
+ "C" and ![]() /
/ ![]() + "V" key combinations.
+ "V" key combinations.
That's the basics of using the track editor, but below we go into a bit more detail on what each of the different sections are for and how to use them:
Change OrientationChange Orientation
The change orientation button ![]() can be used to change the way the Sequence Editor displays the different sections. By default you will have the Canvas View at the top and the Track Editor and Dopesheet at the bottom, but this can be changed by clicking the button to cycle through the different layouts, or by clicking the Options button
can be used to change the way the Sequence Editor displays the different sections. By default you will have the Canvas View at the top and the Track Editor and Dopesheet at the bottom, but this can be changed by clicking the button to cycle through the different layouts, or by clicking the Options button ![]() to open a menu and select the layout that you want. The following layouts are available:
to open a menu and select the layout that you want. The following layouts are available:
| Split Window | With this option the Sequence Editor will be split into two separate windows, where the main IDE window will show the Canvas view in the full desktop and the new window will show the Dope Sheet and Track Editor. Clicking the button again will change the layout again and remove the extra window. | |
| Snap Top | This option snaps the Track Editor and Dopesheet to the top of the IDE. | |
| Snap Right | This option snaps the Track Editor and Dopesheet to the right of the IDE. | |
| Snap Bottom | This option snaps the Track Editor and Dopesheet to the bottom of the IDE (this is the default view). | |
| Snap Left | This option snaps the Track Editor and Dopesheet to the left of the IDE. |
You can also reset the Sequence Editor layout at any time by clicking the Reset option ![]() . This will restore the editor to its default state and re-open any sections that had been closed.
. This will restore the editor to its default state and re-open any sections that had been closed.
This search box permits you to quickly search through the various tracks of the sequence to find the one you wish to edit. Typing any text here will tell you how many asset tracks have been found with that string in them, and also highlight the arrows to the side of the search box. Clicking these arrows will skip to the first and consecutive assets that fulfill the search criteria.
Each asset that is added to a sequence will be given its own track, and these are listed here. If the asset track has any parameters set for it, then these will also be shown underneath as parameter tracks. You can expand or contract the parameter tracks by clicking ![]() on the arrow icon to the left of the track name, and you can edit the track name by using a slow double click
on the arrow icon to the left of the track name, and you can edit the track name by using a slow double click ![]() on the track and then giving it the name of your choice. Note that there are no restrictions on the name you give and you can use spaces, non alpha-numeric characters and start them with a number if you wish.
on the track and then giving it the name of your choice. Note that there are no restrictions on the name you give and you can use spaces, non alpha-numeric characters and start them with a number if you wish.
The different types of parameter tracks available are explained in more detail in the section on "Adding Parameter Tracks" further down this page.
Once you have added a parameter track, you can add and remove parameter keys to specific frames to set the value for that parameter. This can be done using the "Record Key" ![]() or "Delete key"
or "Delete key" ![]() button (see the section on "Track Key Controls" for more information), or you can do it using the Key Controls on the parameter itself. To use these controls, you need to position the playhead in the Dope Sheet to the frame you want to edit, and then you can click the circular "key" icon on the left of the parameter track. If the frame has no key assigned to it the circle will be "empty" and clicking it will add a new key and allow you to edit the parameter value. If the frame has a key already, then the circle will be "filled" and clicking it will instead remove the key from the frame:
button (see the section on "Track Key Controls" for more information), or you can do it using the Key Controls on the parameter itself. To use these controls, you need to position the playhead in the Dope Sheet to the frame you want to edit, and then you can click the circular "key" icon on the left of the parameter track. If the frame has no key assigned to it the circle will be "empty" and clicking it will add a new key and allow you to edit the parameter value. If the frame has a key already, then the circle will be "filled" and clicking it will instead remove the key from the frame:
 You'll notice too that in the image above you can use the arrow buttons on either side of the parameter key marker to quickly skip between key frames in the dope sheet too, without having to position the playhead manually.
Parameter ValuesParameter Values
When a parameter track has been added, you can edit the values for some of them by simply setting the playhead in the Dope Sheet to the frame with the key you want to change and then use the different canvas widgets to edit the position, rotation, scale or origin of the asset. These changes will be reflected in the key value for that frame. However, not all parameters can be edited this way, or it may not be precise enough for your needs, and in those cases you can edit the parameter value directly by clicking on it in the track and setting it to the required value for the parameter type.
Note that some parameter tracks may have a "link" icon ![]() next to their values, which means they can be linked together. This is done by clicking the icon to enable/disable linking, and when enabled, editing one value will also set the other.
next to their values, which means they can be linked together. This is done by clicking the icon to enable/disable linking, and when enabled, editing one value will also set the other.
In a similar way to regular objects, sequences can have events that can run some code assigned to them. The code is assigned in the form of a script function which can take no arguments and will be called when the event is triggered.
Events are added by clicking the Add Event button ![]() which will open the following window:
which will open the following window:
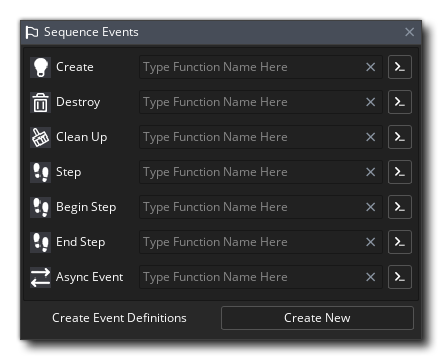
The events listed here are as follows:
Each event can be assigned a single function which will be called when the event is triggered. You can assign the function using the input box for the vent, and clicking the arrow button will open the script editor for the function to be edited. You can also click the Create New button at the bottom to create a new script resource with "boilerplate" functions already defined and ready to be filled in. Note that you can change the function names to anything you require and do not have to use the predefined names, and you can also remove any function definitions that you don't need. It's important to note that functions used for sequence events cannot take any arguments.
Sequence events can also be added and edited using code. For more information please see Sequence Events, Moments and Broadcast Messages.
Keyframe ControlsKeyframe Controls
The keyframe control buttons are one of the ways that you can add, remove or edit specific keys in the dope sheet. The buttons are as follows:
Visible / Lock TogglesVisible / Lock Toggles
Both asset tracks and parameter tracks have a button to toggle track visibility ![]() and to lock the track
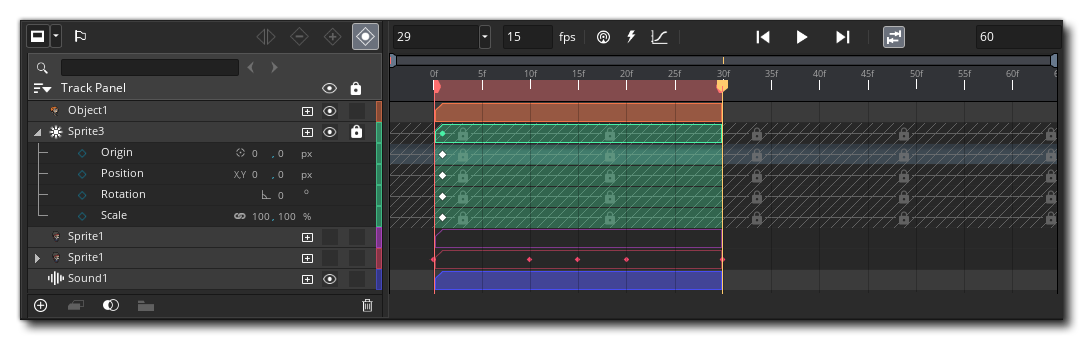
and to lock the track ![]() . If you disable the visibility of the track, then it will not be shown when the sequence is run in a room, nor will it be shown in the sequence canvas while testing, and toggling the visibility of an asset track will also toggle the visibility of its parameter tracks. Locking a track simply means that this track will no longer be able to be edited in any way. Note that tracks that are invisible will be drawn faded on the dope sheet, while tracks that are locked will be drawn with an overlay, so you can immediately see what state each track is in:
. If you disable the visibility of the track, then it will not be shown when the sequence is run in a room, nor will it be shown in the sequence canvas while testing, and toggling the visibility of an asset track will also toggle the visibility of its parameter tracks. Locking a track simply means that this track will no longer be able to be edited in any way. Note that tracks that are invisible will be drawn faded on the dope sheet, while tracks that are locked will be drawn with an overlay, so you can immediately see what state each track is in:
Each asset track you create will be assigned a random colour by the IDE to make it easier to identify on the Dope Sheet. This colour can be changed at any time by simply clicking the colour bar for the track and then selecting the colour you want to use from the Colour Picker window that opens. Any colour selected for an asset track will automatically be applied to all the parameter tracks associated, however you can then edit the colour of each parameter track individually so it is different if required. Note that if you then change the asset track colour again, this will override any changes made to the parameter tracks.
Adding Parameter TracksAdding Parameter Tracks
The Add Parameter ![]() button can be used to add a single parameter track to the selected asset track. As mentioned earlier on this page, parameter tracks can be of various different types depending on the asset that it is related to. Below is a list of all the different parameter tracks available and what they refer to, as well as the assets that they can be applied to:
button can be used to add a single parameter track to the selected asset track. As mentioned earlier on this page, parameter tracks can be of various different types depending on the asset that it is related to. Below is a list of all the different parameter tracks available and what they refer to, as well as the assets that they can be applied to:
The buttons at the bottom of the track editor are the different track actions and can be used for the following purposes:
There are two further pages with information relating to tracks and parameters that are also of interest, the first is about using Animation Curve assets to generate parameter tracks, and the second outlines how to create Clipping Masks: