Best Practices When Programming
On this page we are going to cover some "best practices" when programming your game, and at the same time explain a little bit about the inner workings of GameMaker. Before continuing, however, it is worth noting two very important points:
- This is a guide, and not the be-all-and-end-all-definitive-100%-perfect method to write your game! The things mentioned here are generally more on the organisational and micro-optimisation scale and should be incorporated into your programming habits when you feel comfortable with GML and think that they are appropriate.
- If your game runs fine and you are happy with things as they are, then don't rush to change everything just to squeeze a few extra FPS out. You have to strike a balance between readable, flexible and modular code with the time and energy required to change things, as well as the overall gain at the end. Basically, if it isn't broken, don't fix it and keep what you learn here for your next project.
With that said, lets move on and look at some general tips for writing good GML code that you can apply at any time...
Programming StyleProgramming Style
When it comes to writing code everyone has a style. The style you program in is the way you place your brackets, how you indent the lines, and how you declare and name variables, etc., and is essential to making your code clear and readable to other people (and to your future self, when you have to come back to this project after a time on something else).
There are many, many programming styles, and some would argue that theirs is the best one to use, but the truth is that almost any style is fine as long as you are consistent when using it and it is clear and obvious what everything is and does.
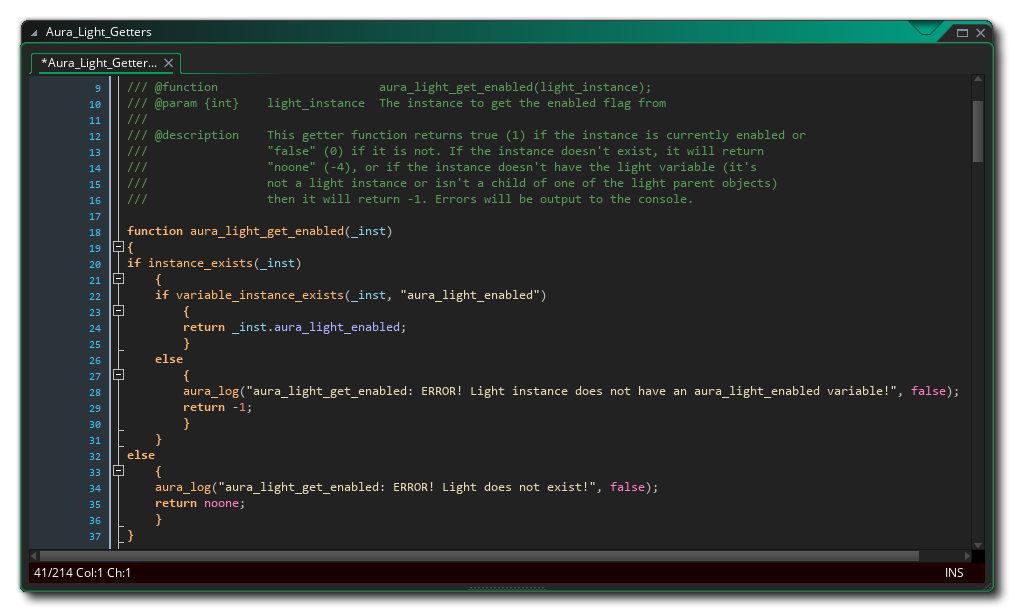 The above image is an example of a function declaration in a script to illustrate the above points. You can see that it uses the JSDoc style comments to clearly explain what it all does, and the coding style is consistent, with 4 space indents, underscores used for local vars, logged output, etc...
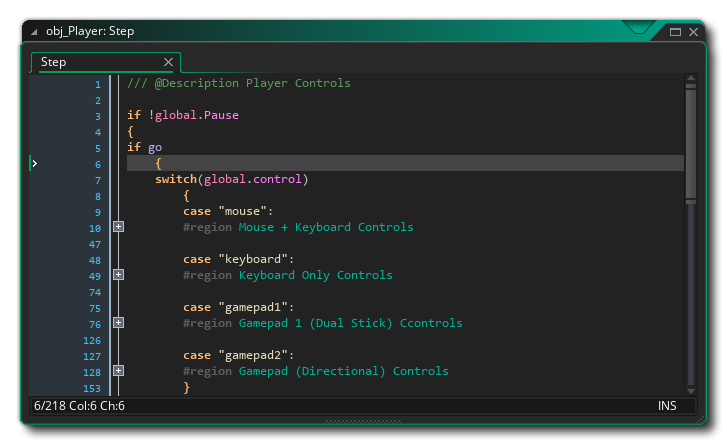
Also note that while the script editor permits you to fold code at each of the open/close brackets, you can use #region and #endregion tags to section off parts of your code and greatly enhance readability, especially when dealing with larger scripts which contain multiple functions. Regions can be commented, too - see the Editing section of this page in the manual):
 When writing code, you should be aware that when compiling your final game, GameMaker strips out comments, removes unnecessary line breaks and whitespace, substitutes in constant/macro/enum values, and generally compresses your code down as part of the process. This means that you can add as much whitespace around your code as required and you don't need to worry about keeping your comments short or only using them sparingly.
Use Local VariablesUse Local Variables
Continuing on from the above point about programming style, one thing that a lot of beginners do is to cram as much into one line of code as possible. For example:
draw_sprite(sprite_index, image_index, x + lengthdir_x(100, point_direction(x, y, mouse_x, mouse_y)), y + lengthdir_y(100, point_direction(x, y, mouse_x, mouse_y)));
While not completely unreadable, it is inefficient (the point_direction() function is called twice, for example) and it is messy and awkward to look at. It would be far better expressed as:
var p_dir = point_direction(x, y, mouse_x, mouse_y);
var local_x = x + lengthdir_x(100, p_dir);
var local_y = y + lengthdir_y(100, p_dir);
draw_sprite(sprite_index, image_index, local_x, local_y);
The memory and resources required to create those local variables are negligible, and are far outweighed by the instant benefit you (or anyone else reading the code later) gets from its clarity. The same idea should be applied to functions too, where you should assign sensible names to the input variables, and use clear formatting and local variables where required to make it as readable as possible.
Local variables are fast to process in-game, so make the most of them, and if an expression appears in a code block or script two or more times, think about creating a local variable for it. When using the YoYo Compiler (YYC) targets, if you reference global or instance variables various times in a function or code block it is particularly beneficial to assign them to a local variable at the start of your code and then reference that local variable, as this will give much better performance.
ArraysArrays
Arrays are fast to use and require less memory than data-structures, but they can be optimised further still. When you create an array, memory is allocated to it based on its size, so you should try to initialise an array to its maximum size first, even if you don't plan on filling it until later on. For example, if you know you need an array to hold a maximum of 100 values, you would initialise it to 100 slots straight away, using the array_create() function:
array = array_create(100, 0);
This allocates the memory for it in one "chunk" with all array values being set to the default value of 0 and helps keep things fast, as otherwise every time you add a new value to the array the entire memory has to be re-allocated again.
NOTE On the HTML5 target assigning arrays like this does not apply and your arrays should be initialised from 0 for this target! You can easily handle this by checking the os_browser variable, for example:
if (os_browser == browser_not_a_browser)
{
array_create(100, 0);
}
else
{
for (var i = 0; i < 100; ++i;)
{
array[i] = 0;
}
}
You can also free up the memory associated with an array by setting the variable used to equal 0. So, to clear the array from the code example above you would simply use:
array = 0;
Data StructuresData Structures
In GameMaker data structures have been optimised to be a lot faster than previous GameMaker versions. They still need to be cleaned up (destroyed) when not used to free memory, and they can still be slower than, say, arrays, but the ease of use and the extra functions for dealing with the data they contain can often out-weigh the minimal speed difference, so don't be afraid to use them in your games.
It should be noted that of all the data structures, DS Maps in particular are lighting fast, both to read from and write to, making them an excellent option for all types of tasks.
Previously we mentioned accessors for arrays, but they are also available for data structures, which can help clean up your code and make it much easier to read.
CollisionsCollisions
There are multiple ways to deal with collisions in GameMaker, and most of them come with a bit of extra CPU overhead attached. The collision_ and point_ functions, place_ functions, and instance_ functions all rely on bounding box checks with all instances of a given type within the room, and while there is some optimisation built in to the engine to limit these checks, collisions are never the most effecient thing to deal with. If you start to use precise collisions, performance will also get noticably worse, as not only will you be doing bounding box checks, but you will also be doing per-pixel checks, which is very slow indeed.
That is not to say that you shouldn't use these functions, as they can be very handy. However, you should know which ones to use and when, as they all work slightly differently and will have different speeds. Rough rule of thumb is that the place_ functions are faster than the instance_ functions, which are faster than the collision_ and point_ functions, so read the pages in the manual for each of these types of functions and make sure to choose the most appropriate for every situation.
Alternatively, look into creating a tile-based collision system, which can be created using the tilemap functions or even a custom 2D array or DS grid. These will be very fast and will help boost your game's speed. However, if you are using irregular terrain or walls and objects that don't align to a grid they may not be appropriate. You can find a very simple tutorial on tilemap collisions from the following video link
Texture Swaps And Vertex BatchesTexture Swaps And Vertex Batches
If you switch on the debug overlay, you will see that there are two figures in brackets at the top of your screen when testing. The first is the number of texture swaps being done and the second is the number of vertex batches. A number of factors will influence these figures and you will never get them down to (0) (0) as the engine requires one or two of each every step, but you should aim to get these values down as low as possible.
 For texture swaps, the best and most efficient way to do this is to optimise how your sprites and backgrounds are stored on the texture page. This is done from the sprite properties, and you can create texture pages in the Texture Group Editor. If you have a number of images that are only used in the main menu (for example), then put them together on a separate texture page. The same if you have level-specific images, or the player and the enemies, etc. Basically, you want to group them by use so that the swaps are reduced as much as possible. Additionally, to help keep VRAM optimised you can then use the different prefetch and flush functions to load and remove textures from memory as required.
NOTE As mentioned at the start of this page, if your game runs fine with a decent FPS then don't worry too much about texture swaps... especially when creating projects on the desktop targets. These optimisations are best when used with large games or on low-end mobile devices, and when used incorrectly can they actually negatively impact performance.
Vertex information is sent in "batches" to the GPU for drawing, and in general the larger the batch the better. So "breaking" the batch should be avoided when drawing, as that will increase the number of vertex batches sent to the GPU. There are a number of things that will break the batch, with the main ones being blend modes, changing the shader, changing a uniform for a shader before drawing something, and drawing using the built-in shapes and primitives.
So, if you have a number of bullet instances that draw using the bm_add blend mode - for example - you will be creating a new vertex batch for each one, which is definitely a bad thing! Instead, have a controller object in your game that draws all the bullets instead, like this:
gpu_set_blendmode(bm_add);
with (obj_BULLET)
{
draw_self();
}
gpu_set_blendmode(bm_normal);
NOTE This doesn't just apply to using bm_add - any blending change will break the batch and will give a performance hit.
In this way, all the bullets will be drawn in the same batch. Judicious use of the functions gpu_set_blendenable(), gpu_set_alphatestref(), and gpu_set_alphatestenable() can greatly improve performance and can be enabled/disabled as required throughout your project code, although they may not be appropriate for all types of graphics or projects.
NOTE If you don't require the instance to draw itself when using a controller in this way then you can simply add a comment into the Draw Event to suppress the default drawing, or make the instance invisible (although this will prevent all code running for the instance in all draw events).
Another way to reduce these numbers is to disable the Separate Texture Page option for sprites unless absolutely necessary. Each image stored in this way is sent to its own texture page and batched differently, so having these images on a regular texture page is better. You can then get the UVS coordinates using the sprite_get_uvs() function and store them in variables for use later. It may be a small amount of extra code, but the boost you will get is worth it. Note that this method will not permit texture repeats!
As with all these tips, if it makes your life more difficult to change it and your game runs fine, don't worry about it too much...
ParticlesParticles
Particles offer a very quick and efficient way to create dynamic effects in your game, and in general they give good performance. However, it's worth noting that using additive blending, alpha blending and colour blending on the particles may lower that performance, especially on mobile targets, so if you don't need it don't use it! Additive blending, in particular, can greatly increase the vertex batches and should be used with care.
Note that on the non-WebGL HTML5 target, having multi-coloured, fading particles will require a lot of image caching and will be very slow. However, since particle sprites can be animated, you can create an animated sprite that has sub-images which change colour and then use that for the particle instead. It will still look like a gradual colour change, but not require the constant creation of cache images.
You can find out more about particles from the page Guide To Using Particles.
SurfacesSurfaces
Finally, we're going to touch briefly on using surfaces, as GameMaker has a fairly significant optimisation when using them in your games: the ability to switch on and off the depth buffer.
When you just use surfaces as normal, GameMaker will actually create a surface and an accompanying depth buffer to ensure proper depth sorting when drawing anything in 3D. However, for most 2D games, this extra depth buffer is just not required and so is taking up extra memory space and processing time that could be used for other things. This is where the function surface_depth_disable() comes into play...
This function can be called before you create a surface to disable the depth buffer generation, and all surfaces created afterwards will not have a depth buffer created for them. You can enable/disable this function as required, and can even call it once at the start of the game to disable depth buffers for all subsequent surface calls (and in most 2D games this is fine). It won't give a major performance boost, but it's certainly something to keep in mind if your game relies heavily on surfaces and might stop your game running out of memory on lower-specced devices.
Apart from the main things mentioned above, there are other more general things that can help with performance and that are considered "good practices" too:
- don't be afraid to use the trigonometric functions as (contrary to popular belief) they are pretty fast, especially when compared to particles, collisions, strings, etc...
- don't put code that is not for drawing things in the Draw events
- use an alarm to call any code that doesn't have to be called every step (rather than just adding this into the Step event anyway)
But, as we mentioned at the start of the page, all these optimisations are optional and if your game runs fine with 60 vertex batches, 80 texture swaps, additive blending, etc., then don't worry about it too much! Just keep these things in mind when programming your next game...