Using The Dope Sheet
 The Dope Sheet is where the data from the different tracks added to the sequence is displayed over time, giving you not just an overview of each track, but also a means to edit the position of them as well as the timings for changes in parameters, etc.
When you add a new asset to a sequence, an asset track will be created in the Track Panel and an asset key will be added to the dope sheet at the current playhead position. This key will reflect the play length of the asset in frames:
 The asset key itself can then be edited by moving the mouse to either the start or the end of the key frame and when the cursor changes clicking
  and dragging. This will either move the start of the key or the end of the key, depending on which you have selected, but both will affect the length of the key. Note that you can also change an asset key position by simply clicking anywhere on it and dragging left or right:
 Other than asset keys, the dope sheet will also show parameter key. Parameter keys are initially "points" in time where you signal a change to a property for the asset they are related to, and the sequence will use the value for that point to change the asset. How this is done will depend on whether you have set the keys to linear interpolation or not in the Track Panel. Parameter keys, like track keys, can be moved by clicking and dragging them along the timeline to a new position, and you can also extend the key to more than a single frame using the
  key at the same time as dragging (the cursor will change to show this). This means that you can hold key values over time before continuing with any interpolation to the next key:
 When working with the dope sheet the usual keyboard shortcuts can be used too, i.e.
  /
/  and the left mouse button to select one or more tracks in any order and
  and the left mouse button to select consecutive tracks. You can also cut, copy and paste them using the / +"X", / + "C" and / + "V" key combinations.
NOTE By default, the parameter keys under an asset key are selected together with the asset key (and, because of that, move with it when you move the asset key around). Change the setting Select asset keys and keyframes together in the Sequences Preferences or hold down the / Option key while pressing the left mouse button to change this behaviour.
There are also different options for keys available from the right mouse button  menu, which are detailed below. Note that when pasting keys into the dope sheet using these commands, the keys will be pasted at the current position of the playhead.
That's the basics of using the dope sheet, but below we go into a bit more detail on what each of the different sections are for and how to use them:
Region Start / Region EndRegion Start / Region End
These markers are the clip region start and end points. These can be used to set a specific section of the sequence to be shown in the room when the game is run, and will also be used as the loop points when previewing the sequence in the editor. These points cannot be greater or less than the total sequence length as set in the Sequence Editor Sequence Controls. To change the position of a clip region marker, simply click and drag them to the desired frame.
Zoom ControlsZoom Controls
This bar is used to show the current zoom of the dope sheet and it can also be used to change this zoom level. You can click on the end widgets and then drag to change the level of zoom:
Note too that you can zoom the dope sheet in or out using the / key and the mouse wheel  .
.
Asset TracksAsset Tracks
Asset tracks are represented on the dope sheet as "keys", which are coloured bars representing the position of the asset and the length of time it's active in the sequence. As mentioned above these can be moved around and lengthened and shortened as required. Note that an asset track key that is longer than the asset itself in duration - for example a sound might last 5 frames and you stretch its key to 15 frames - will be repeated for the entire duration of its key. Asset tracks and keys can be copied and pasted using the standard keyboard shortcuts or further modified using the right mouse button menu options (explained further down this page).
If you delete an asset track key, this does not delete the track itself, nor does it delete any track parameters that have been added, it simply deletes the asset key from the dope sheet. If there are no further keys for this track, you can re-add them by dragging an asset from the Asset Browser into the dope sheet and it will be added as a new key, but note that you cannot add an asset that is distinct to the original asset (ie: if you delete a key for a sprite, you cannot then add a sound asset into that key position).
Note that any object tracks in a Sequence will have their instances created as soon as the Sequence element is created in a room, regardless of where their asset keys begin on the track. The Sequence controller simply toggles the visibility of the instance to hide and show it depending on the position and duration of the track's asset key and does not repeatedly create and destroy it. As a result, instances will run their Create events when the sequence element is created and not when their asset keys begin.
Parameter TracksParameter Tracks
Parameter tracks are represented on the dope sheet as coloured bars underneath the main asset track they belong to. The bars of colour themselves cannot be edited and are purely a visual representation of the track that the parameter keys are being applied to, and it's the individual points on the parameter track that are edited (see Parameter Keys, below).
The PlayheadThe Playhead
The playhead is the position in time at which the timeline is currently being previewed. This position is used when dropping assets into the Sequence Canvas to set the position where they have been added as well as a number of other things, like adding parameters, or splitting keys. When you press "play" on the sequence editor canvas, the playhead will move through the sequence, and you can also click on it and drag it to move to a specific frame within the sequence or to "scrub" over multiple frames and get a quick preview without playing the whole thing.
Parameter KeysParameter Keys
Parameter keys are the "points" shown on a parameter track wherever a change in that parameter has occurred. These points can be moved as required and expanded so that they last more than one frame (as explained further up this page), and you can edit their value either from the Track Panel, or by changing the asset on the canvas (if it is a scale, position or rotation parameter). Note that all parameter track keys will also be reflected as a point on the asset key track that the parameter belongs to, but these points cannot be edited and are there as an informational aid when you have collapsed the different parameter tracks in the track panel.
Parameter CurvesParameter Curves
The dope sheet also permits you to use parameter curves instead of keyframes in your parameter tracks to change the parameter values. These curves can either be embedded as part of the sequence asset, or can be external animation curve assets that are applied to a parameter track. See the section on Using Animation Curves for more information.
RMB Menu
Clicking the right mouse button within the dope sheet on an asset track will bring up the following menu options (note some options may not be visible depending on whether the part of the track clicked has a key or not):
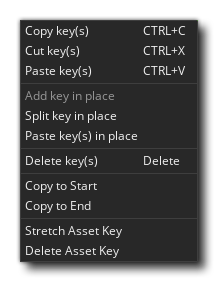
- Cut, Copy, and Paste key(s): These options permit you to cut/copy/paste asset. Note that any keys pasted into the dope sheet using these options will be pasted at the position of the playhead.
- Add Key In Place: This will add a new asset key to the asset track at the frame position nearest where the mouse was clicked, and not at the playhead position.
- Split Key In Place: When used, this will split the asset key under the mouse into two keys, with the split being created at the nearest frame to where the mouse was clicked, and not at the playhead position.
- Paste Key(s) In Place: When you use this option, the copied or cut key(s) will be pasted at the frame position nearest where the right mouse button was clicked, and not at the playhead position.
- Delete Key(s): Selecting this will be delete the currently selected key or keys.
- Copy To Start: This option will copy the selected key(s) to the very start of the sequence (not the start of the clip region).
- Copy To End: This option will copy the selected key(s) to the very end of the sequence (not the end of the clip region).
- Stretch Asset Key: When you select this, the asset key selected will be stretched to the end of the sequence (not the end of the clip region), or stretched until the it meets the start of another asset key on the same track.
- Delete Asset Key: When you use this, the asset key selected will be deleted and you can then add a new asset to the track by dragging it from the asset browser onto the dope sheet track that was deleted. This will create a new asset key which can then be edited, while maintaining any parameter tracks associated with the asset.
Clicking the right mouse button within the dope sheet on a parameter track will bring up the following menu options (note some options may not be visible depending on whether the part of the track clicked has a key frame or not and whether the track is using keyframes or parameter curves):

- Cut, Copy, and Paste key(s): These options permit you to cut/copy/paste parameter keys. Note that any keys pasted into the dope sheet using these options will be pasted at the position of the playhead.
- Add Key In Place: This will add a new parameter key to the parameter track at the frame position nearest where the mouse was clicked, and not at the playhead position.
- Split Key In Place: When used, this will split the parameter key under the mouse into two keyframes, with the split being created at the nearest frame to where the mouse was clicked, and not at the playhead position.
- Paste Key(s) In Place: When you use this option, the copied or cut keyframe(s) will be pasted at the position where the right mouse button was clicked, and not at the playhead position.
- Delete Key(s): Selecting this will be delete the currently selected keyframe or keyframes.
- Convert To Embedded Anim Curve: This option will convert all the keyframes for the selected parameter track(s) into an embedded animation curve (see the section on Using Animation Curves for more information). Alternatively, if used on a parameter curve that uses an Animation Curve asset, this will copy the curve asset into the track as an embedded parameter curve.
- Set To External Anim Curve: This option permits you to assign an Animation Curve asset to the parameter track (see the section on Using Animation Curves for more information).
- Convert To Keys: With this option you can convert an animation curve to individual keyframes. Note that if the curve has used catmull-rom interpolation this will be lost and the keyframes will use linear interpolation between the points on the curve instead, and also note that keys generated from an animation curve must fall on a frame. This means that any curve with points that are between frames will be placed at the nearest integer frame value when converted into keys, potentially changing the behaviour of the curve.
- Export Embedded Anim Curve: This option lets you take an embedded animation curve and convert it into an Animation Curve asset, which will be shown in the Asset Browser and can then be used elsewhere.
- Open Editor: This will open the dope sheet curve editor for editing embedded or external animation curves that have been applies to the paramter track. This is the same as using the Toggle Curve Mode
 button on the dope sheet.
 - Copy To Start: This option will copy the selected keyframe(s) to the very start of the sequence (not the start of the clip region).
- Copy To End: This option will copy the selected keyframe(s) to the very end of the sequence (not the end of the clip region).
- Stretch Parameter Key: When you select this, the asset key selected will be stretched to the end of the sequence (not the end of the clip region) or until the next keyframe on the track. A stretched parameter key means that it will maintain it's value for as many frames as it's stretched over. If used on a parameter curve, the curve will be stretched to the end of the sequence, or until it meets another curve on the track.
- Delete Parameter Key: When you use this, the parameter keyframe(s) selected will be deleted.