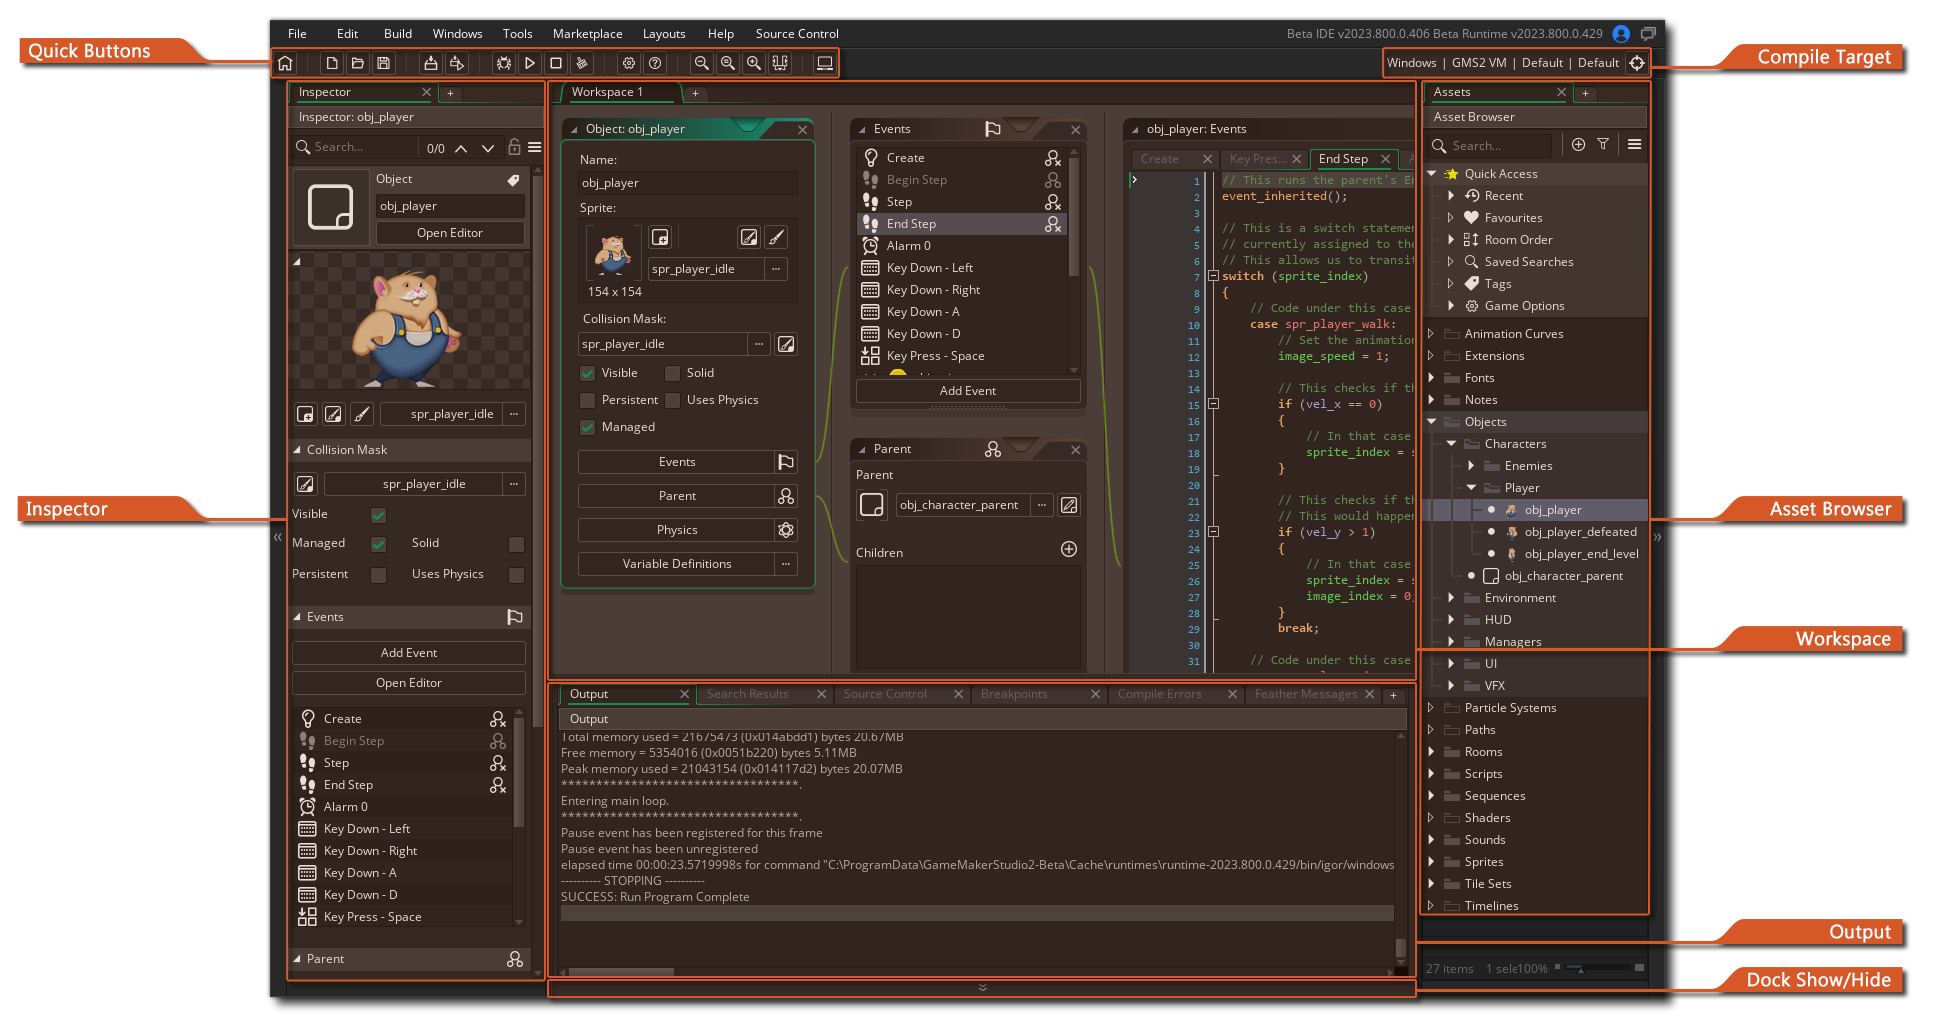
After logging in and starting a new project, GameMaker will take you to the initial workspace with some basic windows docked to the IDE. In general, the workspace is simply an area where you can organise the different assets for your game while you are working:
As you can see, the initial workspace is on a tab at the top of the screen (and you can rename it by double clicking the tab), but you can create further workspaces for the project by clicking the ![]() to the side, giving you multiple possible workspaces for any single project. For example, maybe you are working on interactions between the player and several enemy objects, so you'd have the player on its own workspace and the enemy objects in another, and perhaps another workspace only to show the scripts that both use.
to the side, giving you multiple possible workspaces for any single project. For example, maybe you are working on interactions between the player and several enemy objects, so you'd have the player on its own workspace and the enemy objects in another, and perhaps another workspace only to show the scripts that both use.
Another important feature of workspaces is that you can click ![]() on the tab and select Detach Workspace to open it into its own individual window that's separate from the main IDE window, making it very easy to organise things if you are using - for example - multiple displays. You also merge these secondary workspace windows back into the main one by dragging the tab back onto the first window.
on the tab and select Detach Workspace to open it into its own individual window that's separate from the main IDE window, making it very easy to organise things if you are using - for example - multiple displays. You also merge these secondary workspace windows back into the main one by dragging the tab back onto the first window.
NOTE Although you appear to have two instances of the IDE running when you do this, they are both for the same project and you cannot have one project in one and another in the other unless you specifically open two instances of GameMaker.
When you first start GameMaker, your workspace will already be populated by a couple of windows which will be "docked" to the IDE. These are explained briefly below:
 Selecting any one of these options will create a new, empty resource of the given type for you, with the name field highlighted so you can immediately give it a name. Note that while the Asset Browser is docked to the IDE by default, you can take it out and into its own window by clicking
 There are also a set of preferences related to how certain things will be displayed in the workspace so you can customise how it looks as well as certain aspects of the general workflow. You can find these preferences from the following page:
While within any workspace you can call up the Right Button Menu at any time by right-clicking ![]() anywhere, which will open the following menu:
anywhere, which will open the following menu:
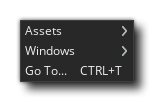
Clicking Assets will open up a list of all the assets in The Asset Browser that you can create, and selecting any one of them will create that asset resource for you, as well as focus the workspace on the editor window for that resource. If you click the Windows option, you will be shown a list of all the currently open windows within the workspace and you can select any of them to have the workspace focus on that window. Finally you have the Go To option which will open the following window:
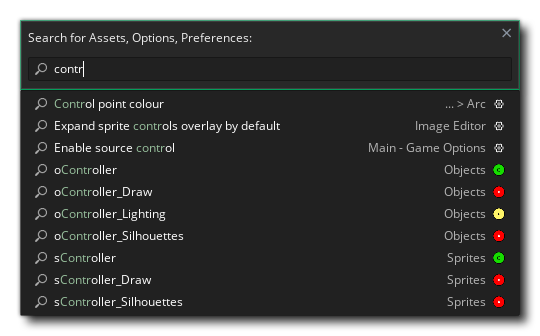
This window permits you to search through every asset, function, Game Option and Preference in your project for the search term you input. For example, typing "icon" as the search term will show all the items in your project that have "icon" somewhere in their name, e.g.: if a sprite is spr_Icon_Play, then it will show up here, as will the object " obj_Iconoclast", and you'll even see the Game Options for the different icons like "Icon for hdpi". Clicking on any of the items shown in the filtered list will open it in the current workspace, or focus the workspace on it if it is already open.
Note that you can also use the keyboard shortcut Ctrl + T / Command + T to open the Go To window, and that the number of items listed is (by default) set to a maximum of 16. You can change this maximum limit along with other search options in the Go To section of the General Preferences.
For more information on Workspace Navigation, please see the section on IDE Input And Navigation.
We mentioned briefly above that you can dock many windows into the current workspace window and you can un-dock those that are already docked. If you click ![]() on, for example, the Asset Browser tab at the top and drag it to the left of the current workspace, you will see that it becomes a free-floating window.
on, for example, the Asset Browser tab at the top and drag it to the left of the current workspace, you will see that it becomes a free-floating window.
 This converse is true and if you drag certain windows to the sides of the workspace (or the bottom) then they will be docked, meaning that it essentially becomes part of the IDE window overlay and is no longer independent. When doing this, you drag the window to the area you want to dock to and it will be highlighted to show that you can dock the window there:
 In this way you can create a personalised IDE experience that fits your workflow and way of doing things. It's worth noting that all docked windows can be hidden/unhidden individually by clicking the button to the side of the docked items (highlighted in the image at the top of this page), or you can hide/unhide all docked items using the quick-button
 ![]() at the top of the IDE, and note too that the IDE will remember docked windows between sessions.
at the top of the IDE, and note too that the IDE will remember docked windows between sessions.
NOTE Some windows will disappear from the dock when you change editors, like in the Room Editor. However when you return to the editor in question, they will be re-opened in the dock again.
Below we list the quick buttons that are available by default with GameMaker. These buttons can be found at the top of the IDE and represent many of the most common commands that you'll be using while working in GameMaker to make your workflow smoother (note that most of these buttons have an equivalent menu option too):
| Opens The Start Page in a new workspace. | |
| Create a new project. | |
| Open a previously created project. | |
| Save the current project. Note that by default GameMaker will save your project automatically (depending on the Preferences that you have set) and this button is simply so you can force a save at any time. | |
| This will compile the current project and create an executable package (or packages) for the target platform. It will first open the file explorer so that you can select where you want to save the project and then compile the game. See the section on Compiling for more information on setting up the compile targets. | |
| This will create an executable, just like the option above, and then it will launch that executable on the target platform. | |
| Clicking this will test-run your current project along with the debug module. Use this to test and debug your game. You can find more about the debug module from the section on The Debugger. | |
| Clicking this will test-run your project on the chosen target platform. | |
| This button can be used to cancel the compilation of your games to the target module, or (on certain targets only) to stop the game while it is running after it has been compiled. | |
| Pressing this button will clear the current asset compiler cache. GameMaker stores images, sounds, scripts, etc. between use in a cache so as to save time when testing your game as it will only re-compile those things that have been changed before testing. However, this cache may become corrupted or "stale" over time, or you may wish to do a full test with no caching being done previously, in which case you can clear the cache by pressing this button. IMPORTANT It is recommended that you always clear the cache before creating the executable for any target platform. | |
| Clicking this will open up the Main Game Options Editor. Note that this is only the main, general, options for the current project, but you may also have platform specific options being listed as a part of The Asset Browser. | |
| Click this to open the manual (or alternatively, press F1). | |
| This will zoom the focused workspace out to make everything smaller (you can also achieve this holding down Ctrl / Command and using the mouse wheel | |
| This will reset the focused workspace to be 1:1 again. | |
| This will zoom the focused workspace in to make everything larger (you can also achieve this holding down Ctrl / Command and using the mouse wheel | |
| This will toggle all the docked elements between hidden and unhidden. | |
| This will toggle laptop mode on and off (This will only appear if you are currently using a laptop - see the section on IDE Input And Navigation for more details) |